Adding realistic fire to a raw plate is always a challenge. But doing it to a night shot? That is a whole different beast. You aren’t just compositing flames; you have to worry about how that intense, flickering light interacts with the surrounding environment: the brick walls, the dark foliage, and the smoke itself.
If the relighting looks off, the entire illusion breaks instantly.
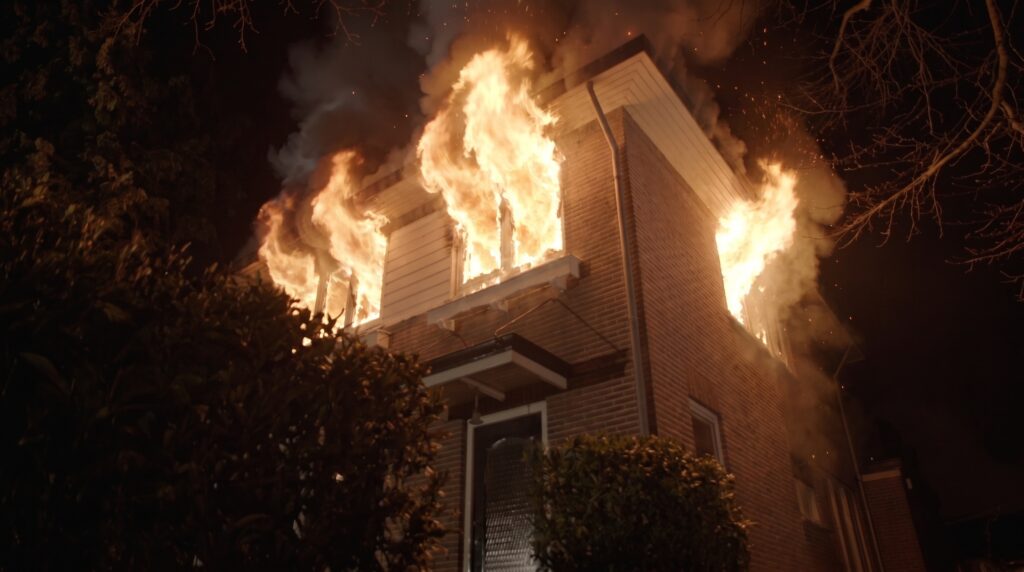
The raw footage to be worked on
I recently put this to the test using my go-to workflow (the same one I used for the USS Missouri project), and the results proved that you don’t need a massive 3D pipeline to get Hollywood-grade night relighting. You just need a bulletproof formula: Good First Frame (FF) + Reference Video = Killer Output.
Here is exactly how I did it.
The Workflow Breakdown
Step 1: Prep in After Effects
Before touching any AI tools, you need a clean slate.
Import the raw night footage of the house into After Effects.
Find the perfect starting frame and export it as a high-quality PNG. This will serve as our canvas.
Step 2: Crafting the Perfect First Frame (The Nano Banana Phase)
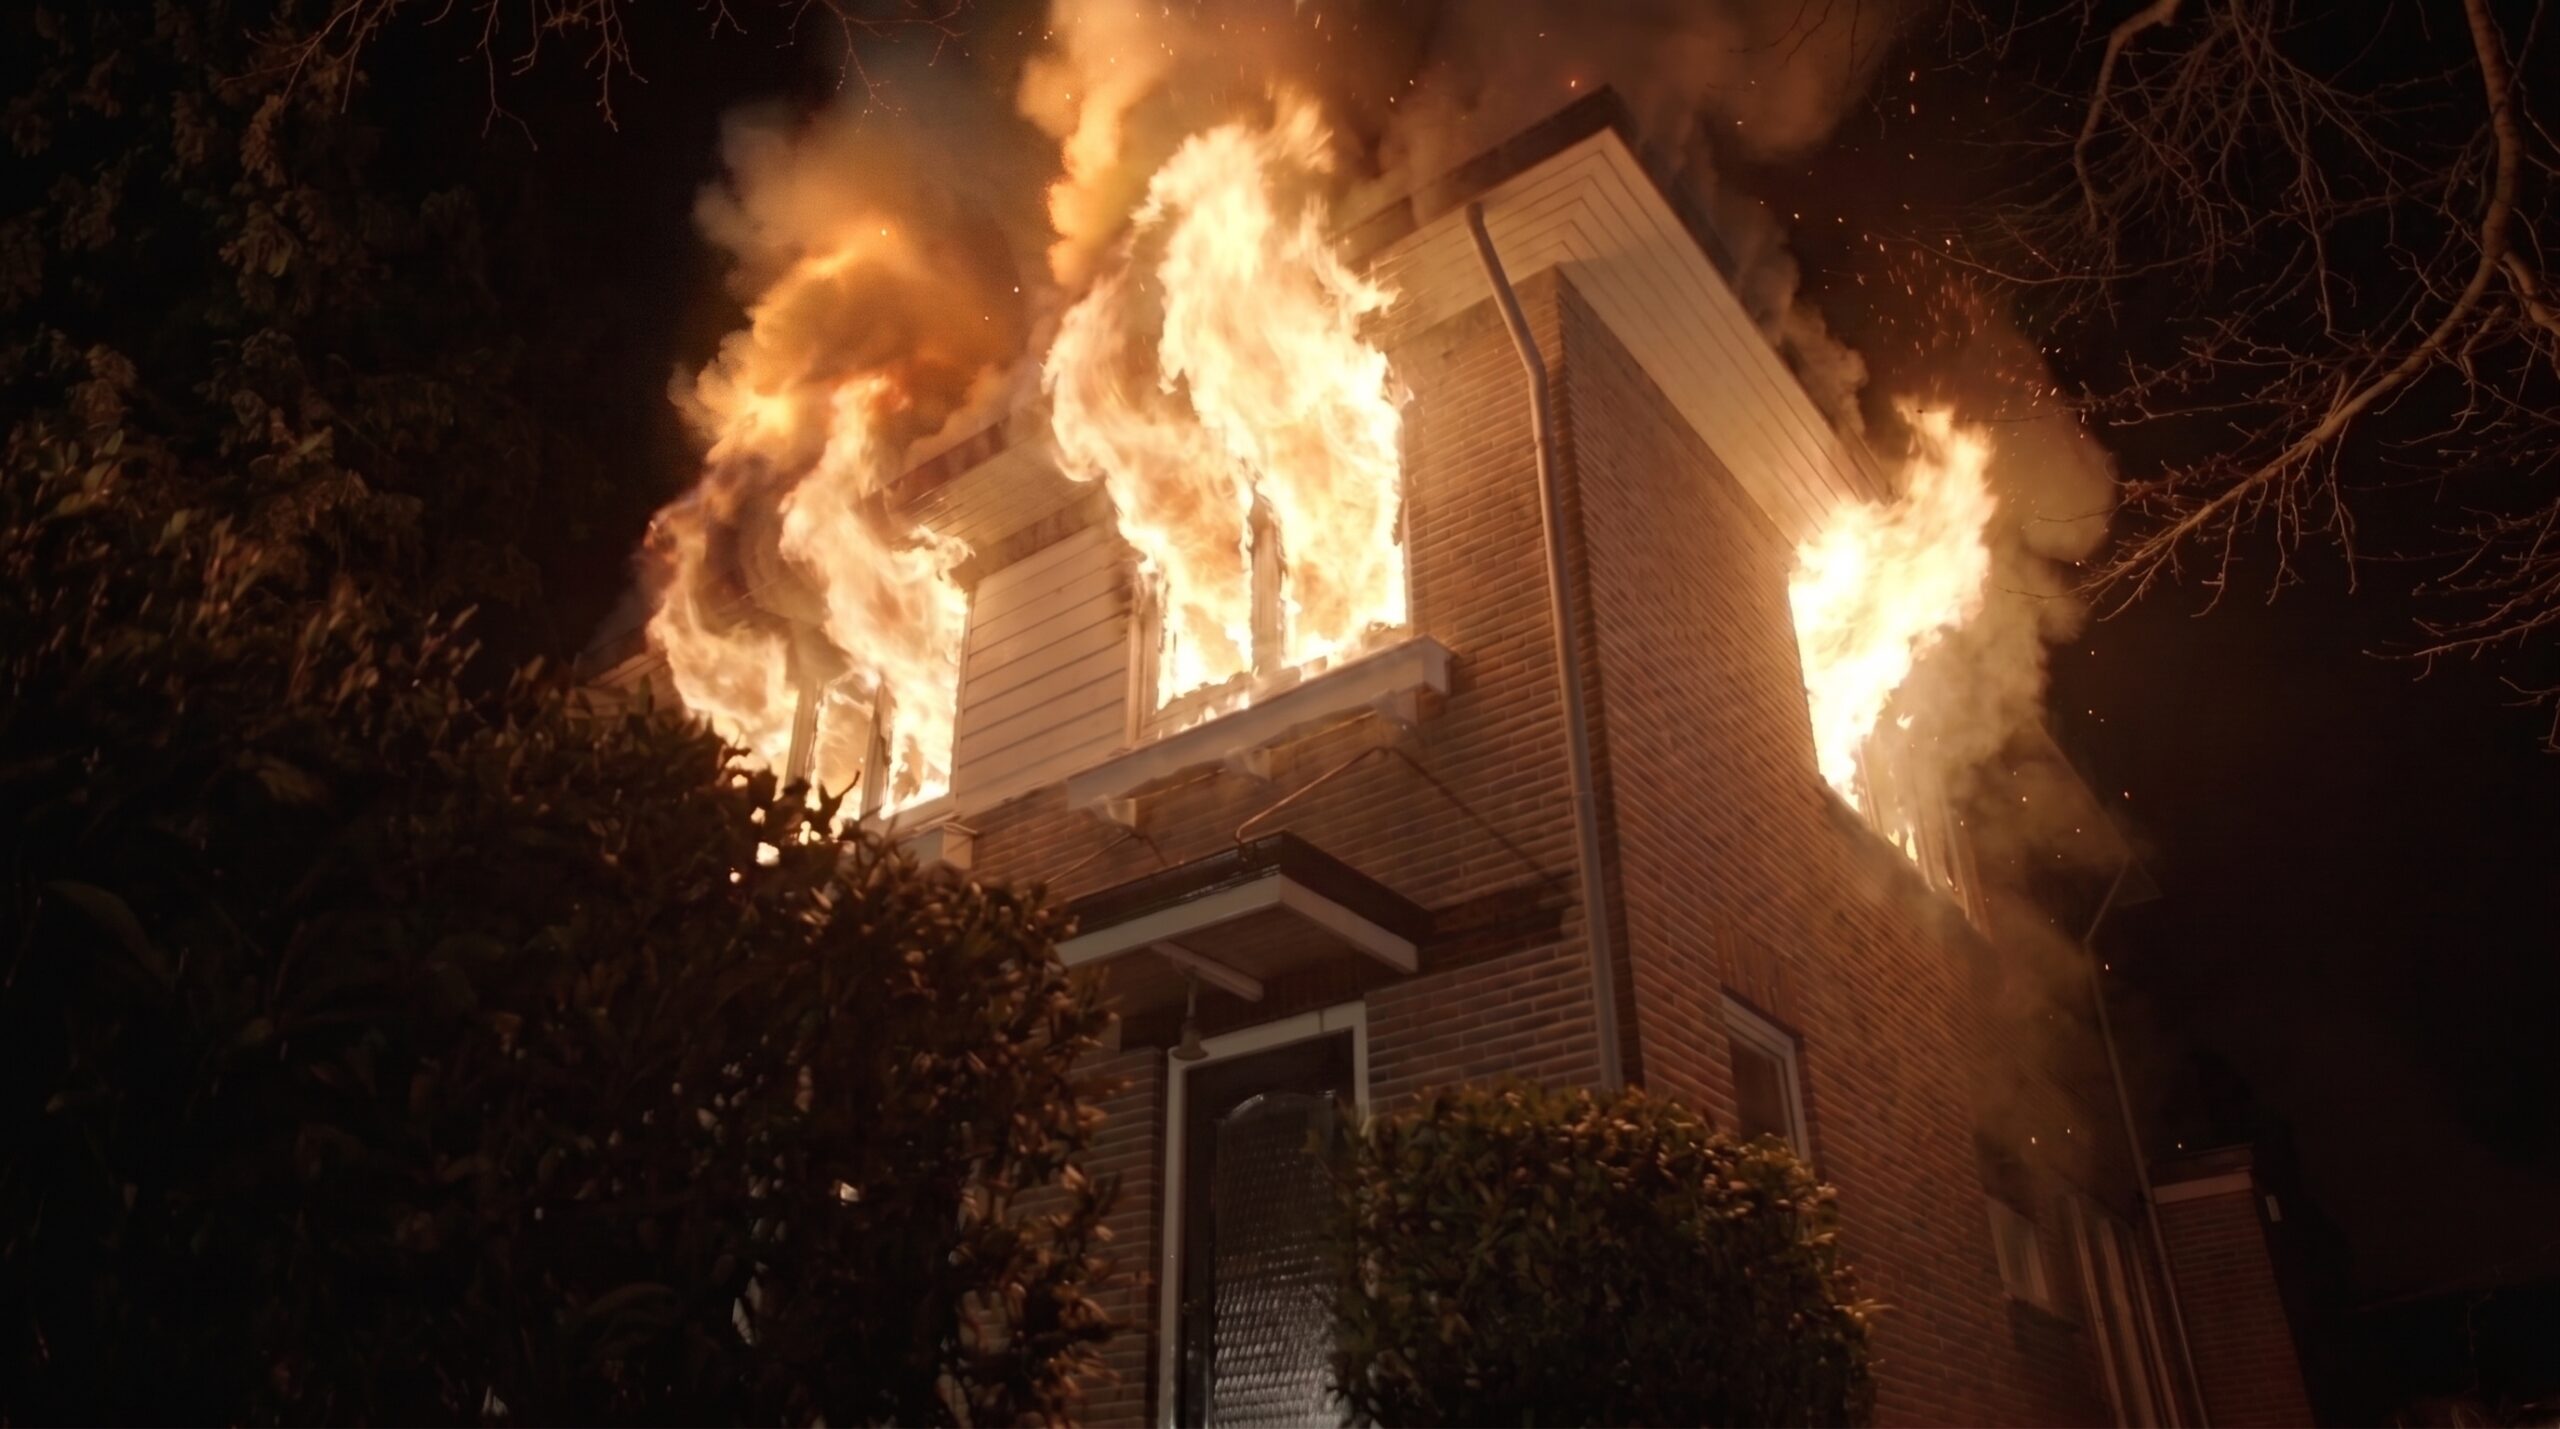
I took that high-quality PNG into Nano Banana to paint in the fire. To test my level of control, I decided to keep the fire contained to just the second floor rather than engulfing the whole house.
It took three targeted prompt iterations to get it right:
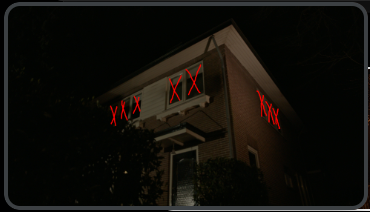
Iteration 1 (Setting the scene): I marked the second-floor windows with a red “X” and prompted:”Blazing fire extruding out of the windows marked by red X. Fire source from inside the house. Broken windows. Soot. Smoke.”
Raw first frame + AnnotationsResultant first iteration
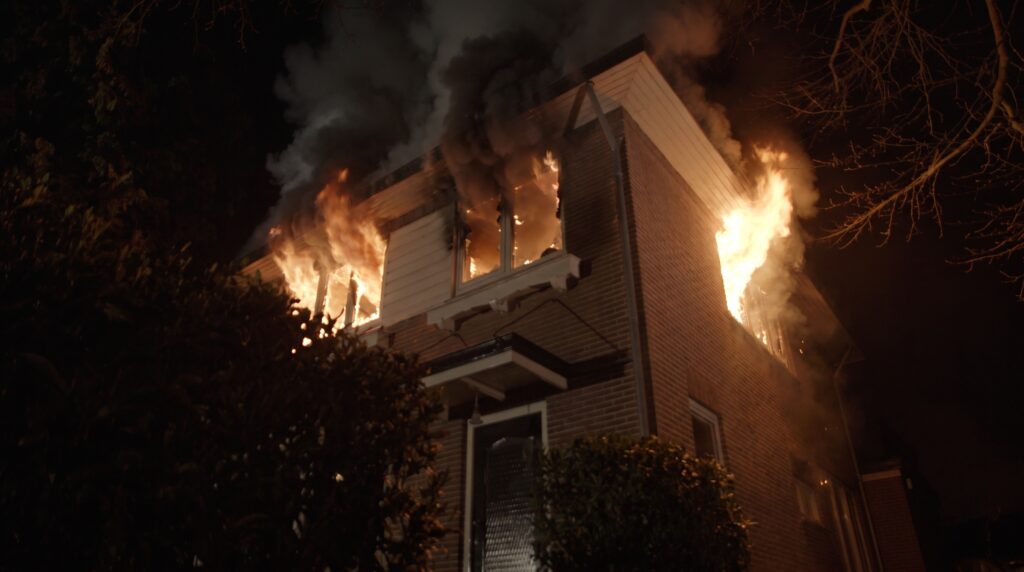
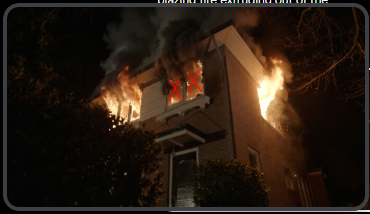
Iteration 2 (Refining the flames):“Blazing fire extruding from windows marked X.”
First Iteration + AnnotationsResultant second iteration
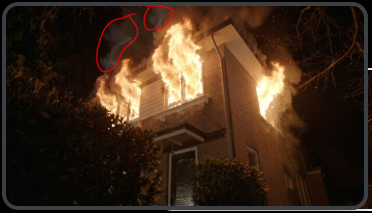
Iteration 3 (Fixing the lighting): The smoke was looking a bit disconnected from the light source, so I circled the smoke area in red and prompted:”Change smoke color circled in red to match the light from the fire.”
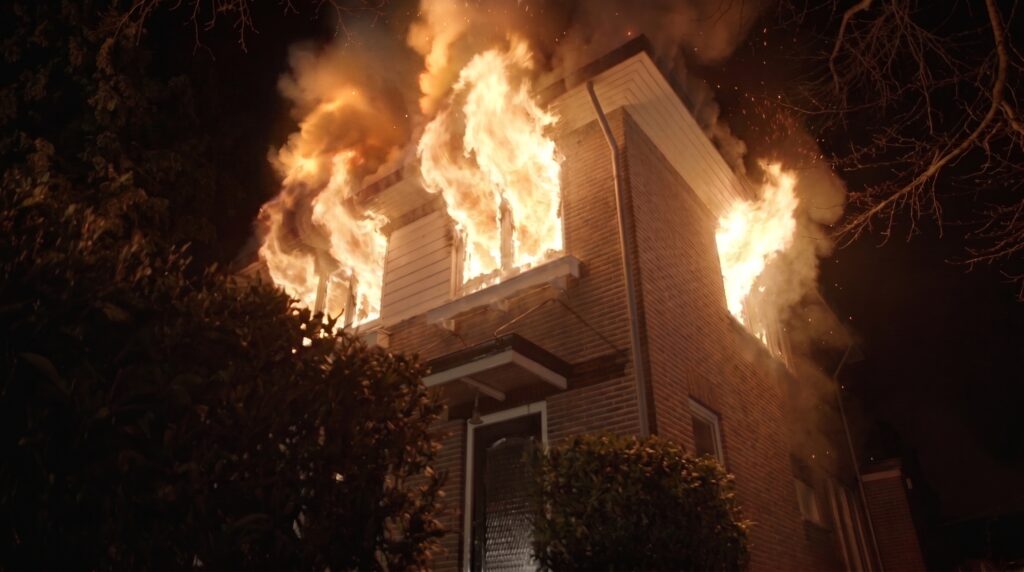
Second Iteration + AnnotationsFinal first frame
With that third tweak, the lighting locked into place. I had a gorgeous, high-contrast, perfectly lit static first frame.
Step 3: Bringing It to Life in Kling
Next, I brought the newly minted first frame and the original raw reference video over to Kling AI (using the Kling Omni model).
Using the reference video to guide the camera motion and general structure, I used the following prompt to let Kling know exactly how the physics of the fire and light should behave:
Kling Prompt:
“Reimagine @Video as a realistic house fire burning through second-story windows. Flames are slowly spreading and getting stronger. Thick black-grey smoke billowing upward, denser near the base, thinning as it rises. Flame light flickering and casting moving warm light onto the brick wall and nearby foliage. Subtle heat haze distortion near the flame edges. Night time, high contrast between fire and darkness. Use @Image as the exact first frame.”
The Verdict: Why This Workflow Wins
I’ll admit, I was skeptical at first. Running a dark night scene through Nano Banana, manually painting in fire, and expecting the AI to realistically relight the environment seemed like a big ask. I assumed it might look flat or pasted-on.
I was completely wrong.
Final Kling output
The final output from Kling was incredibly seamless:
Natural Motion: The flames didn’t just loop; they danced, spread slowly, and even animated realistically around the small window panes.
Dynamic Relighting: The flickering orange glow cast beautifully onto the brick facade of the house and the surrounding dark foliage.
Atmospheric Depth: The heat haze and the gradient of the rising smoke perfectly blended the simulated elements with the real-world plate.
If you are hesitant to try complex nighttime FX composites with generative video, don’t be. Spend the extra time dialing in your First Frame first. If the lighting is painted correctly on frame one, the video model will do the heavy lifting to keep those physics consistent.
We’ve all been there. A brief comes in for a film or TV project requiring a massive, high-detail ocean shot—in this case, the legendary USS Missouri (BB-63) cutting through the water.
Normally, this is the cue for your workstation to melt. You’re looking at heavy FLIP fluid simulations for the ocean, secondary whitewater/foam simulations, and Pyro sims for the diesel smoke chugging out of the funnels. It’s a process that can easily eat up days of setup, caching, and rendering.
For this project, I decided to test a different hypothesis: Can Generative AI replace heavy Houdini simulations for quick, production-ready rushes while maintaining absolute camera and animation control?
The short answer is yes. But the secret isn’t just writing a clever prompt, it’s how you prep your 3D assets to act as the ultimate control rig. Here is how I went from a raw 3D model to a finished, color-graded shot in just one day.
1. The Strategy: 3D as the Ultimate Guide
In film and TV, camera direction and object animation are non-negotiable. “Garbage in, garbage out” is the golden rule of AI. If you feed an AI video generator a loose, low-res viewport flipbook, the AI has to guess too much, resulting in warping and boiling.
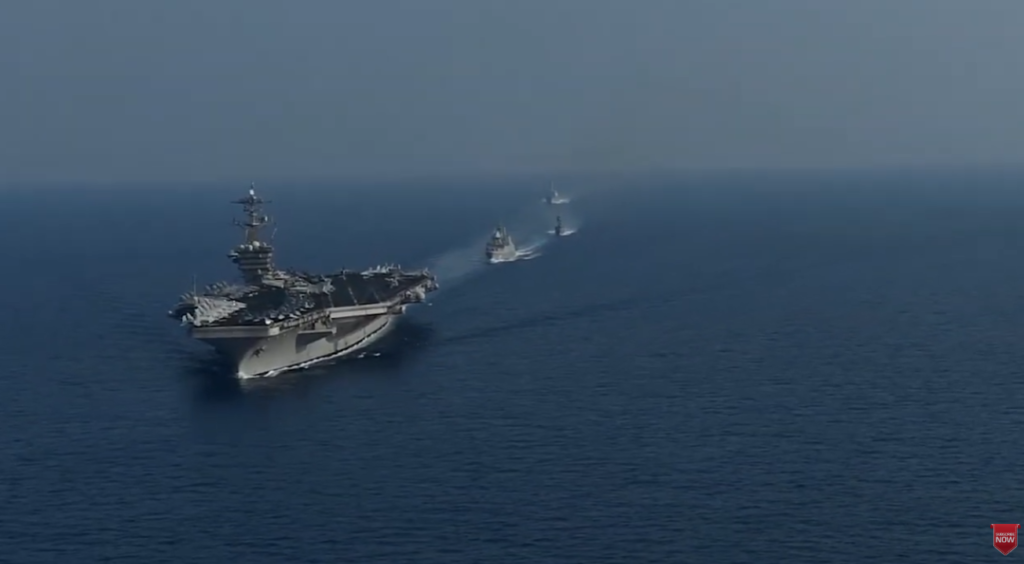
I needed a rock-solid reference video. I decided to frame the shot as a high-altitude aerial photo-op, the kind navies use to showcase their fleets (a composition I actually got to know intimately during my own navy days).
Example photo ops of naval ships (Credit: Military Tech YouTube Channel)
To give the AI the best possible guide, I opted for a semi-full Karma render in Houdini (with lighting and textures, but absolutely zero simulation elements).
The Houdini Prep & The “Reflection Grid” Trick
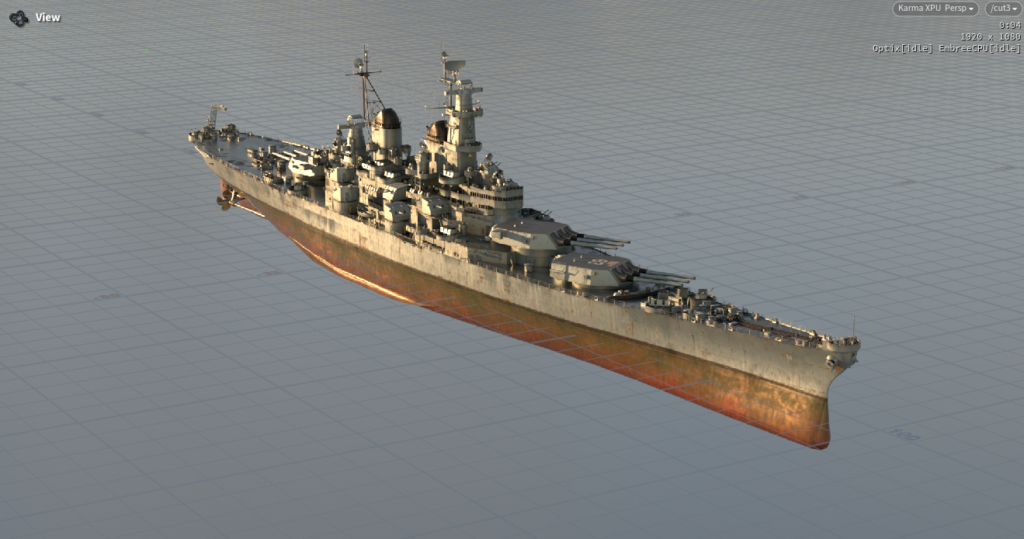
I loaded up the USS Missouri model, adapted its OBJ textures for Houdini’s Karma renderer, and animated a sweeping aerial camera path. I also added some subtle, realistic movement, animating the A and B gun turrets rotating slightly as the ship cruised forward.
However, rendering a ship on black space doesn’t work for AI. I needed to establish lighting and reflections:
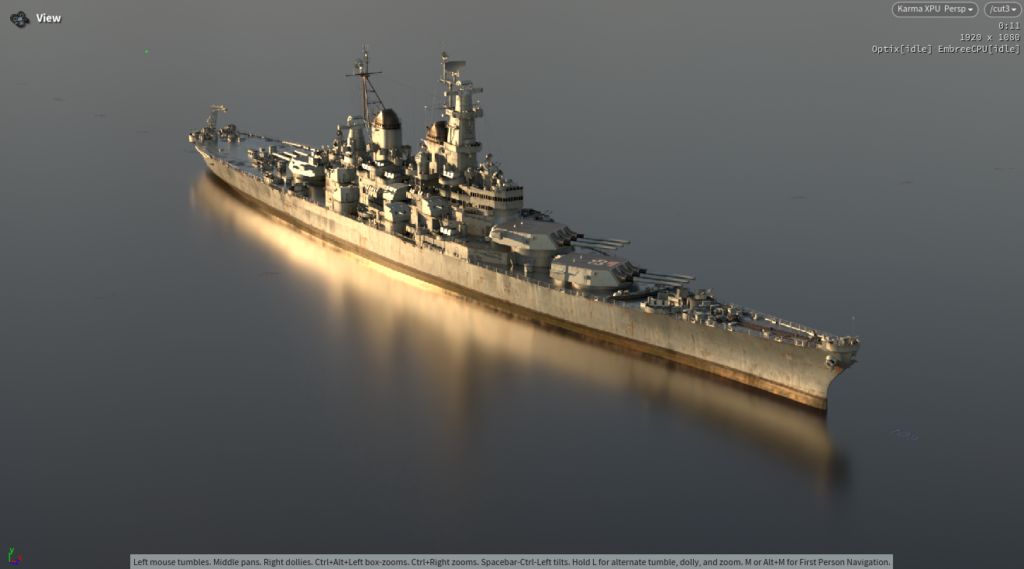
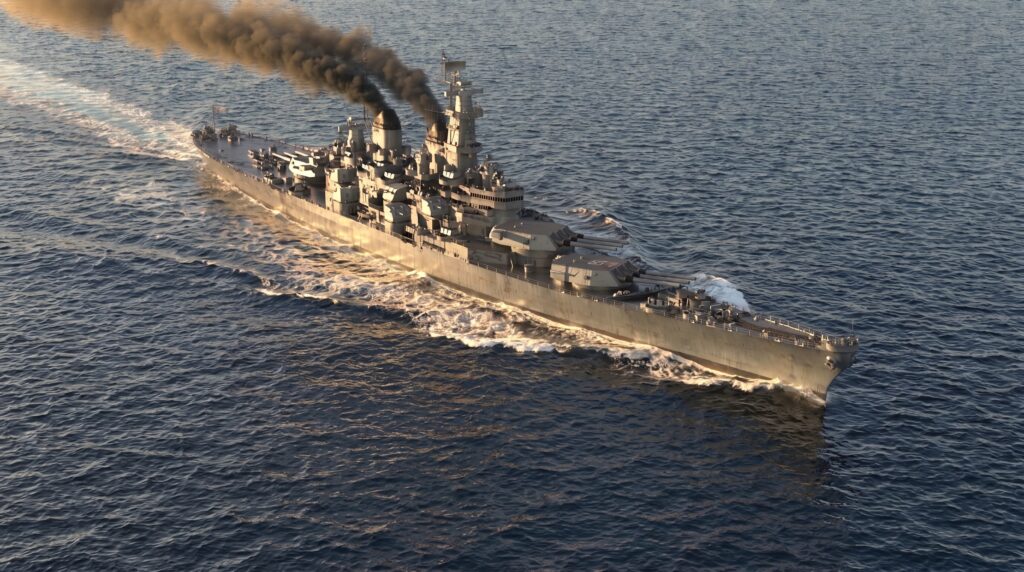
The Reflection Problem: I lit the scene to look like late afternoon with warm, golden-hour sunlight. But without water, the ship’s metallic hull looked flat. I placed a ground grid directly beneath the ship and applied a material that mimicked the reflective properties of ocean water. Immediately, the warm sun bounced beautifully off the hull.
Before and after adding the grid
The Motion Problem: With a featureless reflective grid, the moving ship looked completely stationary as the camera tracked it. To give the camera (and the AI) a sense of speed, I needed a visual reference.
The Solution: I duplicated the grid, turned it into a wireframe white grid, and overlaid it. To prevent these white grid lines from ruining my beautiful hull reflections, I adjusted the geometry render settings so the wireframe grid was only visible to primary rays.
The result? Perfect hull reflections, a clear grid to register relative motion, and a clean 1080p render sequence ready for the AI pipeline.
The semi-full render from Houdini to be used as reference video later
2. Setting the Stage: The First Frame (FF)
Because the first frame dictates the visual quality of the entire video, I needed to replace our placeholder grid with actual, high-fidelity ocean waves, foam, and smoke.
Using my rendered first frame as an image prompt, I wrote a highly specific control prompt to dictate the physics of the scene:
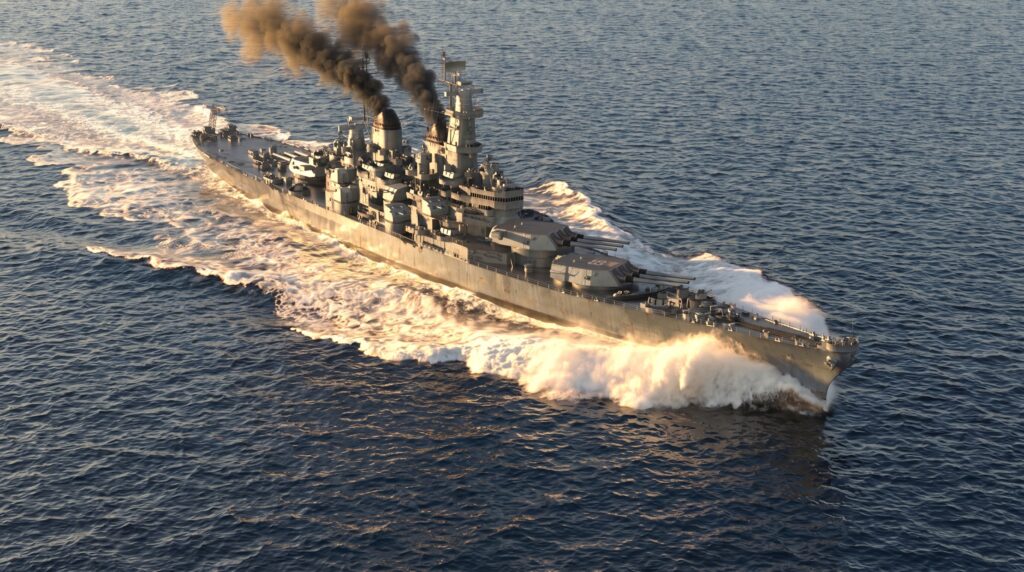
“Change grid floor to ocean. Give the bow wave and wake solid, clearly visible whitewater — a defined white bow wave breaking at the hull with decent foam volume, and a wake trailing behind the ship with an appropriate amount of bright, clearly visible whitewater, picking up warm tones from the light where it catches the foam. Keep this consistent with a heavy displacement-hull warship at moderate cruising speed, not a high-speed planing wake. Foam edges should be organic and irregular, breaking up naturally further behind the ship.
Add two separate columns of dark grey-black smoke, one rising independently from each of the two black funnels, both blown by the same wind, streaming backward at the same consistent angle, never merging into one plume, with clear open space between them — the smoke’s edges may pick up a subtle warm rim from the low sun. Follow the exact light direction and warmth already present in the source image.”
The first output from Nano Banana Pro
Iteration & Tweaking
The first output generated a wake that was way too heavy—it looked like the battleship was trying to drag race. I quickly re-prompted to scale it back:
“Make the smoke columns trail longer towards the back of the ship. 20% less white water.”
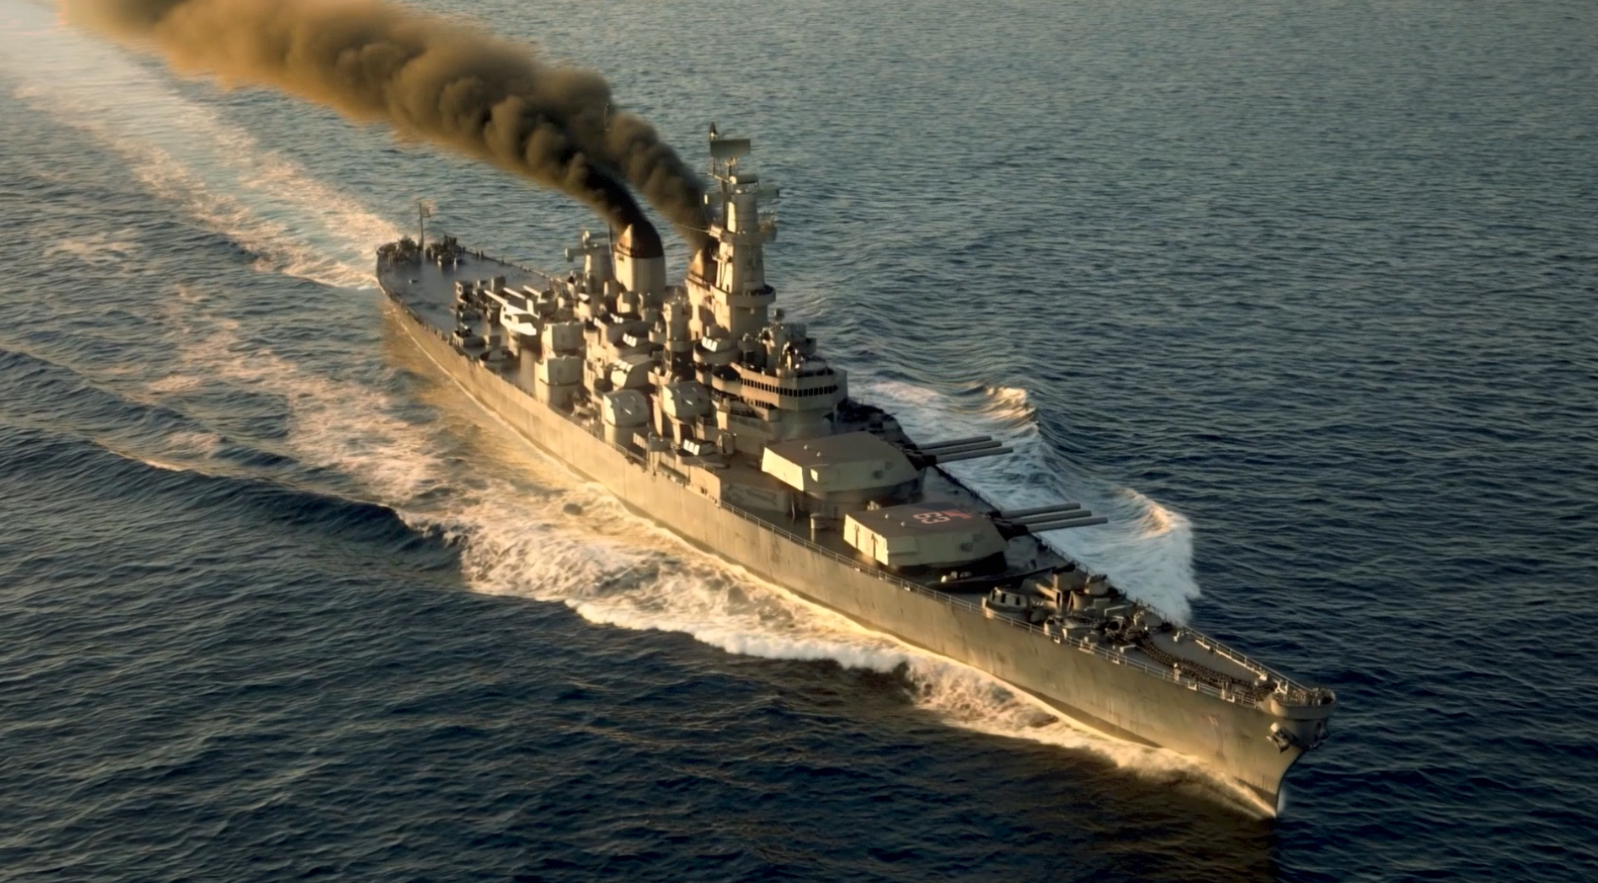
The improved output from Nano Banana
This hit the absolute sweet spot.
3. Bringing It to Life in Kling Omni
With my master assets ready—the perfect First Frame (FF) and my 1080p Houdini reference video—I loaded them into Kling Omni.
I ran the generation using the reference video for spatial/motion information and the image as the exact starting frame, using the prompt:
“Use @Image as exact first frame. Use @Video as reference video and spatial information. The bow wave and wake should have solid, clearly visible whitewater.”
The Output
Output from Kling
The results were incredibly impressive. The water wake looked highly realistic, the lighting remained perfectly consistent as the camera moved, and the dual columns of funnel smoke drifted naturally in the wind.
Fixing the Details in Post
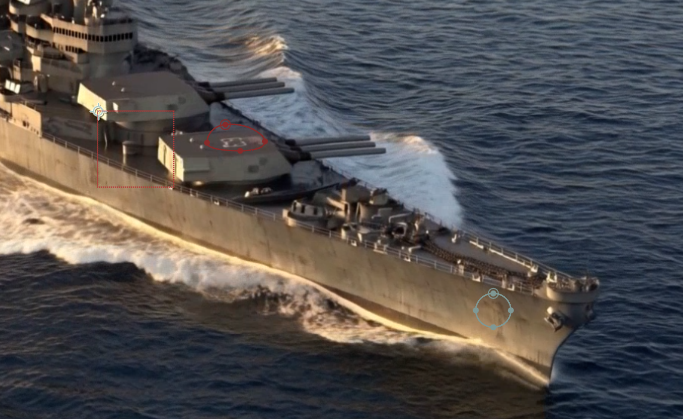
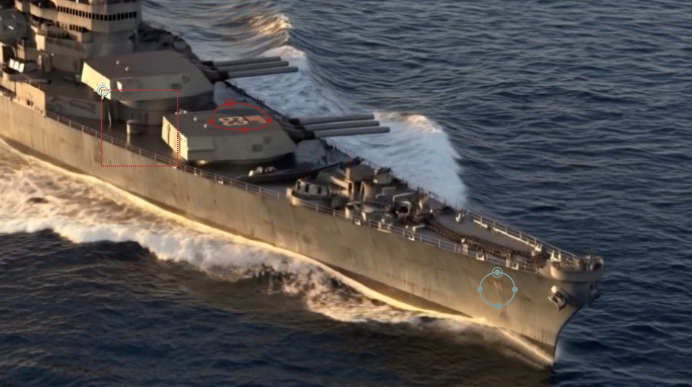
As expected with current Gen AI, fine details like the “63” hull numbering and the American flag printed on the turret had some slight consistency issues over time. However, because Kling followed my 3D reference video so precisely, fixing this was a breeze.
Before and after composing the inaccurate parts of the output
I took the original high-res clean render from Houdini and simply composited the stable decals, flag, and hull numbers right back over the AI video in post. Add a quick color grade, and the shot was complete.
The final result after color grading and compositing
Bonus Test: What Happens When You Push the First Frame Parameters?
To really test how much influence the First Frame (FF) has over the video engine, I ran a quick experiment. I took the earlier iteration of our first frame—the one with the much heavier, highly aggressive bow wave—and ran it through Kling Omni using the exact same prompt and 3D reference video.
The result was a textbook demonstration of how AI interprets initial input data:
1:1 Motion & Physics Translation: The AI immediately locked onto the heavier wake from frame one and maintained that high-energy, violent water displacement across the entire camera move.
Zero Loss in Camera Alignment: Despite the drastic change in water volume and foam density, the model followed the 3D reference video’s spatial motion just as flawlessly as the calmer version.
The Resulting Shot
Here is the high-energy output:
Bonus footage of the output that was produced using a first frame image with bigger and stronger wake
Conclusion: The “First Frame” Controller Paradigm
This project completely shifted how I view the integration of 3D and Generative AI. If you need to deliver high-quality, complex shots on a tight deadline, here are my biggest takeaways from this experiment:
A Film-Grade Alternative for Quick Rushes: For elements that typically demand heavy, time-consuming simulations in Houdini, Gen AI is a massive time-saver. Going from a raw 3D model to a finished, client-ready shot in under 24 hours is a massive win for tight production schedules.
The First Frame is Your “Houdini Parameter Slider”: The most crucial realization was that when you pair a First Frame (FF) with a reference video, the FF acts as your physical controller for the “simulation.” If your first frame has high wake and heavy foam, the AI maintains that high-intensity motion throughout the shot. If you want a calmer sea, you dial it back in the first frame. Your control over that initial image is everything.
Keep Your Video Prompts Simple: When it’s time to prompt Kling, less is more. You don’t need to write a massive block of text describing the scene’s physics. Because you used a high-quality reference video and a detailed first frame, the spatial information, motion, and visual details are already completely baked into your inputs. The AI just needs a simple nudge to do its job.
The Power of the Semi-Full Render: This was my first time testing a semi-full render (complete with lighting, textures, and reflection grids, minus the actual simulations) as an AI input, rather than a flat viewport flipbook. The experiment proved that feeding the AI proper lighting and surface reflection data is the key to unlocking true, production-grade output.
By letting Houdini handle the rigid composition, perspective, and lighting, and letting Gen AI handle the chaotic, computationally expensive fluid dynamics, you get the absolute best of both worlds.
We’ve all seen the impressive AI video clips floating around lately. By combining a First Frame (FF) image with a Reference Video, creators are getting incredibly believable outputs, especially when the reference footage relies on simple, solid geometries.
But believability isn’t the same thing as physical accuracy.
As AI models get better at mimicking motion, a major question remains: How much can we trust AI to properly handle physics-based rendering, like complex light transmission, refraction, and dynamic shadows?
To find out, I set up a strictly controlled environment to test whether modern AI video generators actually “understand” light, or if they just hallucinate pretty pixels.
The Setup: Establishing the Ground Truth
To avoid any ambiguity, I bypassed real-world camera footage entirely. Instead, I built a control test completely in Houdini, complete with dialed-in materials, physically accurate lighting, and a moving light source.
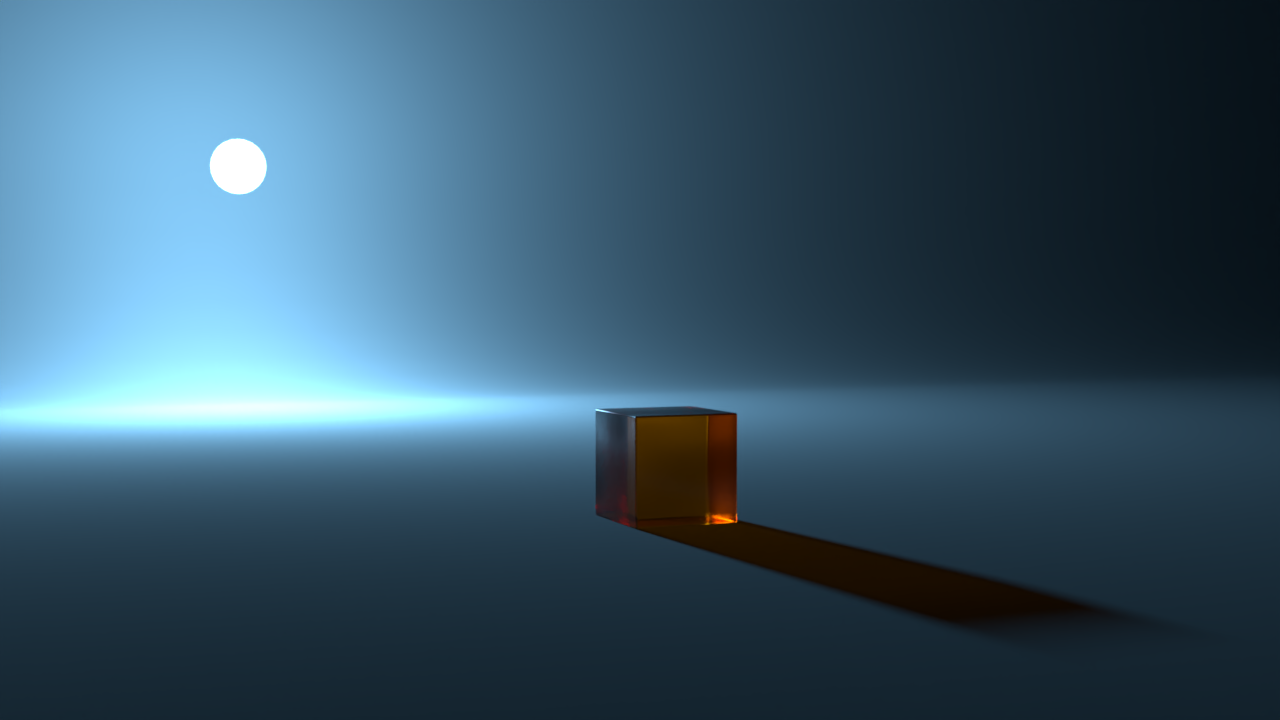
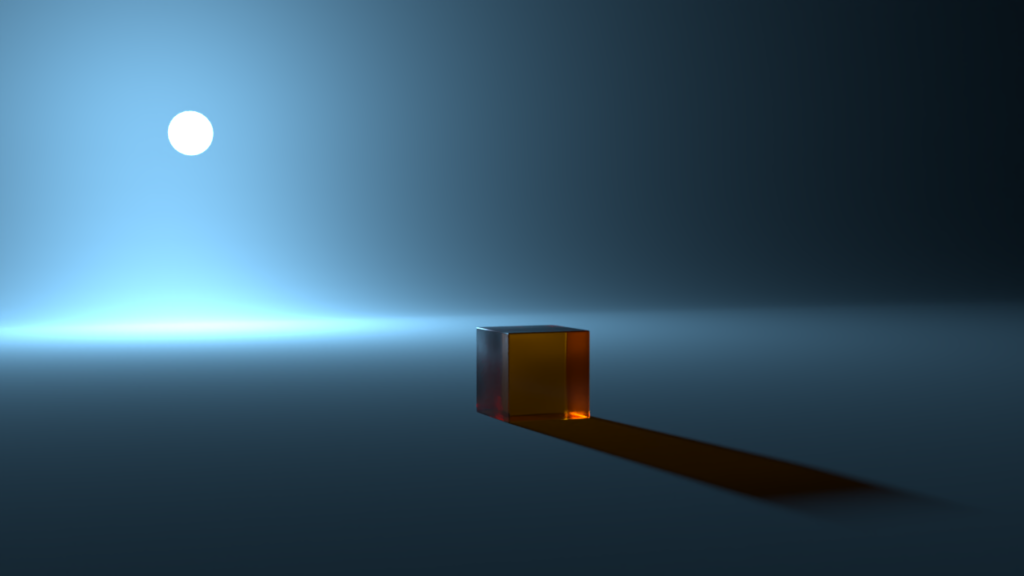
The Scene: A bright, spherical light source translating horizontally behind a transparent orange cube, casting dynamic soft, colored shadows. The Inputs for AI:
Reference Video: The raw Houdini Flipbook viewport preview (to provide the exact geometric motion path).
First Frame: The first frame of the fully rendered and denoised Houdini sequence.
Prompt:“Moving bright ball of light. Realistic shadow cast by the transparent orange cube. Use reference image as first frame.”
Houdini Flipbook renderFirst Frame image used to prompt the Gen AI models
I ran these identical inputs through two of the leading multi-modal video generators: Kling 3.0 and Seedance 2.0. Here is the breakdown of the results.
The Results Analysis
1. The Ground Truth (Houdini + Denoise)
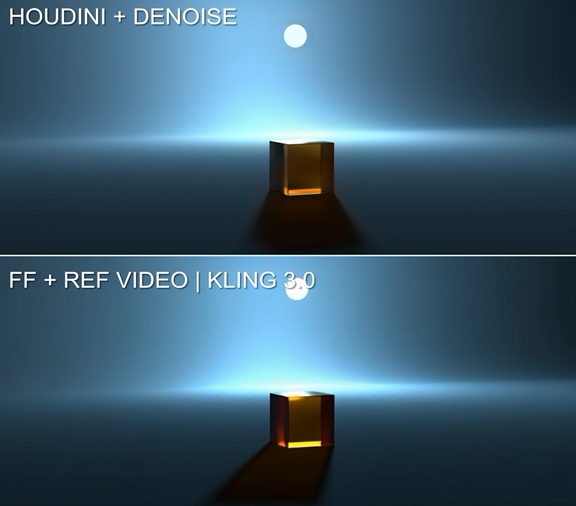
Before judging the AI, let’s look at how actual physics behaves. In the Houdini render, as the bright sphere moves from left to right behind the transparent cube, the resulting colored shadow shifts its angle in exact, inverse correlation to the light source. The orange tinted shadow projected onto the ground is physically accurate and scales logically as the light source changes position.
Houdini control render shot
2. Kling 3.0: Aesthetically Pleasing, Physically Almost There
Kling 3.0 output
Kling 3.0 does a highly commendable job of maintaining the initial aesthetic established by the first frame. The texture of the ground and the glass-like quality of the cube remain quite stable, and the overall movement of the ball and the reflections off the cube are remarkably similar to the control footage.
The Physics Breakdown: Kling actually does a surprisingly decent job mimicking shadow-casting logic for a majority of the clip. It manages to infer depth; when the ball travels further to the right of the frame, Kling correctly elongates the shadow, matching the behavior of the Houdini control footage. However, its understanding of absolute spatial coordinates breaks down at specific points in time. As seen in the reference frame below, when the ball is directly behind the cube, Kling fails the geometry test and skews the shadow to the left, rather than casting it directly in front of the cube. It is approximating the physics based on visual context, rather than calculating actual spatial relationships.
Kling skews the shadow to the left despite the light source directly behind the cube.
3. Seedance 2.0: Loose Tracking and Creative Liberties
Seedance 2.0 output
Seedance 2.0 seems to have a mind and opinion of its own. Despite being fed the same prompts and reference video, it actively decided to ignore the 1:1 motion constraints and initiated a camera pan instead.
The Physics Breakdown: While it abandoned the tracking data (the reference video clearly shows the relative size and position of the ball relative to the cube, yet Seedance interprets the ball’s movement as perfectly symmetrical from left to right), the execution of its own idea is impressive. It handles the camera pan smoothly, and the lighting and material rendering look completely comparable to both Kling and the Houdini control.
The Verdict
The true state of AI video generation isn’t that it completely fails at physics, but rather that it relies on highly educated, aesthetic approximation instead of mathematical simulation.
Kling 3.0 proves that AI can infer complex physical relationships, like elongating a shadow as a light source moves further away, but it will still slip up on basic spatial alignment when it lacks a true 3D coordinate system. Seedance 2.0 proves that these models can render beautiful, accurate materials and lighting, but they often prioritize cinematic flair over strict adherence to your control inputs.
Ultimately, if you do not need exact 1:1 motion tracking with your control footage, tools like Seedance successfully fail the mission by providing gorgeous, usable alternatives. But if you are working in a pipeline that demands absolute precision, where a light must accurately cast a shadow directly beneath it, AI is still a black box of creative liberties. For true control, procedural workflows remain undefeated.
As a visual effects artist, procedural fluid simulations are a staple in my workflow. Building custom velocity fields, tweaking flip solvers in Houdini, and dialing in physically accurate rendering for water takes time, computational power, and a lot of patience. With the rapid explosion of AI video-to-video models, a natural question arises: can these tools bypass the heavy lifting of traditional fluid sims?
Specifically, I wanted to test whether AI can accurately interpret water movement, the refraction of light through a volume, and water caustics. To find out, I set up a stress test comparing a traditional procedural workflow against two AI models: Seedance 2.0 and Kling 3.0.
Here is a breakdown of the experiment and the results.
The Control: Procedural Accuracy in Houdini
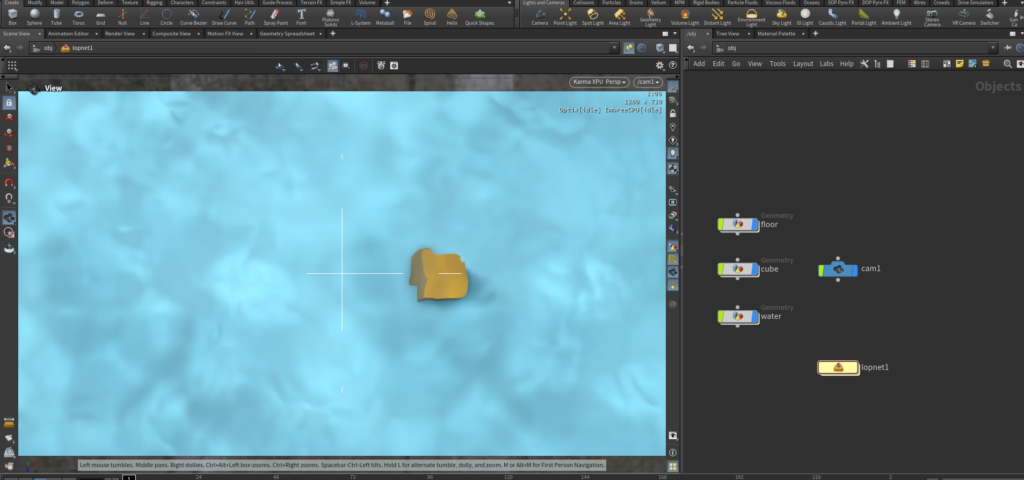
To establish a baseline, I built a controlled simulation in Houdini. The setup was straightforward but designed to test specific optical properties:
A small ocean geometry generating surface waves, placed over a simple grid.
A yellow cube placed on the grid, fully submerged under the water.
Materials accurately assigned to calculate the Index of Refraction (IOR).
Caustics explicitly turned on and lighting set to highlight the light patterns on the floor.
Houdini Setup to make the Control Shot
The scene was rendered in Karma. The very first frame of this render served as the ground truth (and also reference image) for how light should bend around the submerged cube and cast caustics on the ocean floor. The whole 3-seconds shot was also rendered out and composed for comparison with other Gen AI outputs.
The final shot that was made using Houdini and composed in After Effects.
The Methodology
To test the AI, I provided the models with the exact same starting point and motion data.
The Input Frame: The extracted first frame from the Houdini render.
The Reference Motion: An extracted flipbook animation (mp4) of the waves and the motion of the small ocean geometry.
The Prompt:Use ff as first frame. ff shows a yellow cube in shallow water with water caustics, distorted by refraction of light. Use Video1 as reference video for movement of water and position of cube. Interpret the distortion of the cube and water caustics. No audio.
The Flipbook render from Houdini used as reference video
This exact combination was fed into both Seedance 2.0 and Kling 3.0.
The Results: How Did the AI Perform?
Evaluating the outputs required looking past the initial “wow” factor of AI generation and critically analyzing the physics of the scene.
Seedance 2.0: Good Motion, Broken Physics
Seedance 2.0 output
Water Movement: Seedance did a surprisingly good job imitating the motion of the waves from the flipbook reference. It definitely looked like a fluid, and the pure white reflections scattered across the surface were convincing.
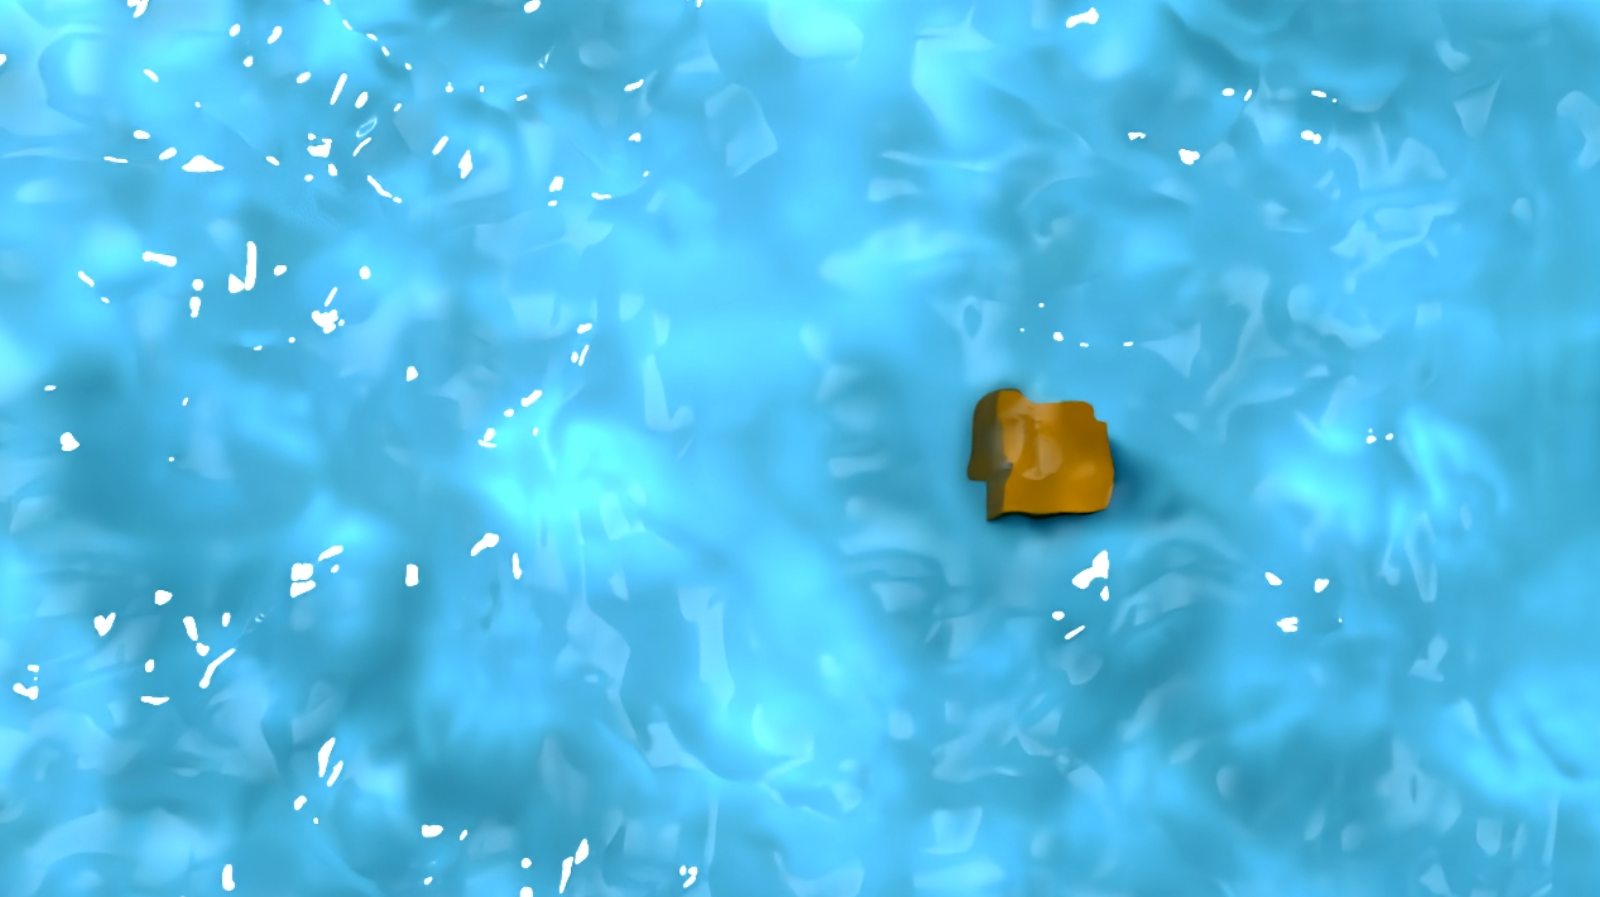
Material Properties: This is where the physics fell apart. Instead of rendering clear water in a pool, Seedance generated what looked like an opaque, sky-blue liquid.
Refraction: Because the model hallucinated a highly opaque liquid, the physics of light transport were completely illogical. A thick, opaque liquid shouldn’t allow light rays from a submerged cube to refract that clearly. Setting that aside, the distortion on the cube was extremely minimal compared to the Karma render. It appeared the model simply morphed the object toward the yellow square I left in the reference video for general positioning. (Note for future tests: removing the tracking square might give the AI more freedom to interpret genuine optical distortion rather than acting as a rigid morph target).
Water Caustics: Due to the opaque nature of the generated fluid, the caustics were almost entirely non-existent.
Kling 3.0: Total Hallucination
Kling 3.0 output
Output: The result from Kling 3.0 was completely unusable for this specific use case. The model entirely misinterpreted the prompt and reference, generating what looked like a frozen layer of ice with water running underneath it. While there were some vague caustic-like patterns on the pool floor and distortion of the cube, the overall output was a failed interpretation of the input data.
Conclusion
While video-to-video AI models are making incredible strides in tracking 2D surface displacement, this test highlights a massive gap in their ability to understand volumetric data and complex physical light transport.
The AI tools treated the reference as a 2D warping task. Seedance 2.0 successfully mimicked the surface fluidity but failed to comprehend the depth of the water, fundamentally breaking the material properties by turning a clear, refractive medium into an opaque liquid. Kling 3.0 simply hallucinated entirely different physical states.
Feature Tested
Seedance 2.0
Kling 3.0
Water Movement
Convincing surface tracking and fluid motion.
Unusable (hallucinated an ice layer).
Material Accuracy
Failed (rendered an opaque liquid).
Failed.
Refraction
Minimal; hindered by opacity and reference morphing.
Some distortion present but unnatural-looking.
Caustics
Barely visible due to incorrect material density.
Failed.
For now, if a project requires precise optical fidelity, where refraction and caustics need to accurately interact with submerged objects, it still absolutely demands a robust procedural solver and a physically based renderer. AI can approximate the broad strokes of movement, but true fluid physics remains securely in the realm of traditional 3D pipelines.
Sometimes, the biggest obstacle in visual effects isn’t the technical execution, it’s the logistics.
Imagine getting a brief that calls for a high-speed pursuit on a quiet stretch of highway, complete with a Korean police cruiser hot on the tail of a getaway car. The traditional route? Applying for permits to shut down a local road, finding a prop Korean police vehicle to rent, hiring stunt drivers, and navigating a mountain of red tape just to make sure you don’t break any major traffic laws.
Instead of dealing with that logistical nightmare, I decided to build the entire sequence in post using a hybrid workflow of traditional After Effects pre-vis and AI video generation. Here is a breakdown of my process.
Step 1: The Raw Plate and Asset Generation
I started with a simple, smooth tracking shot of an empty road.
The raw plate to be worked on
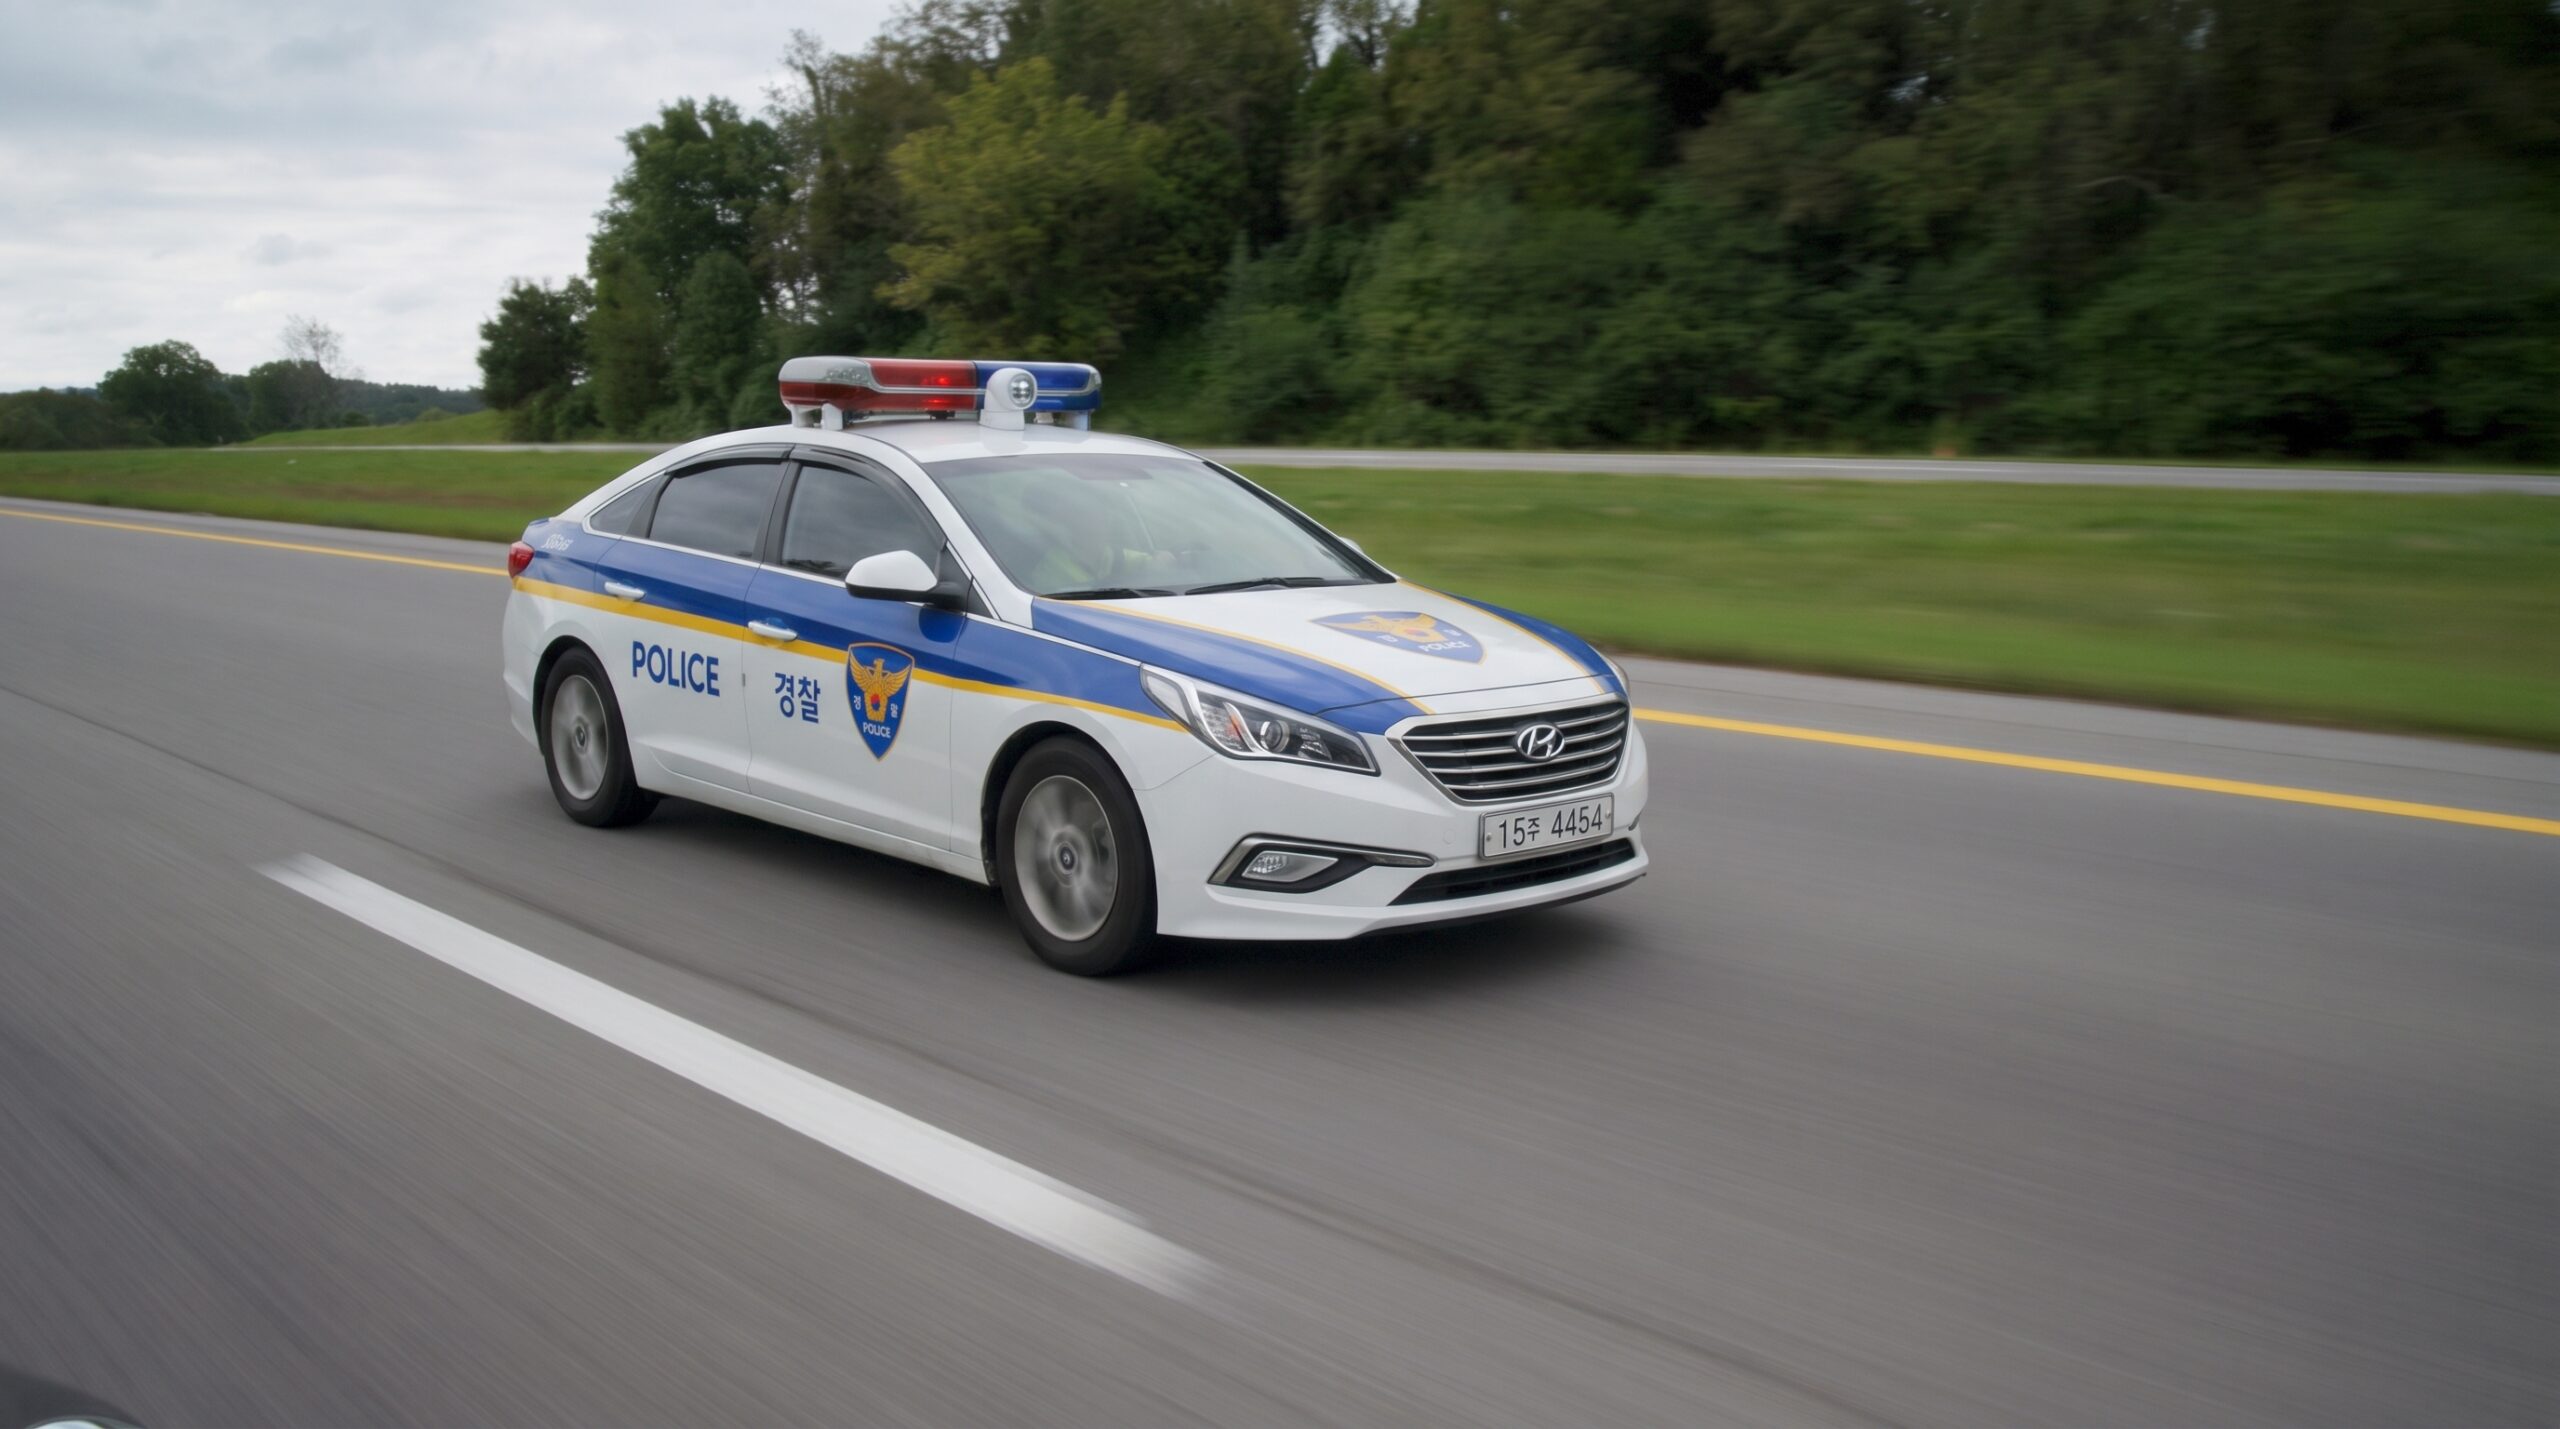
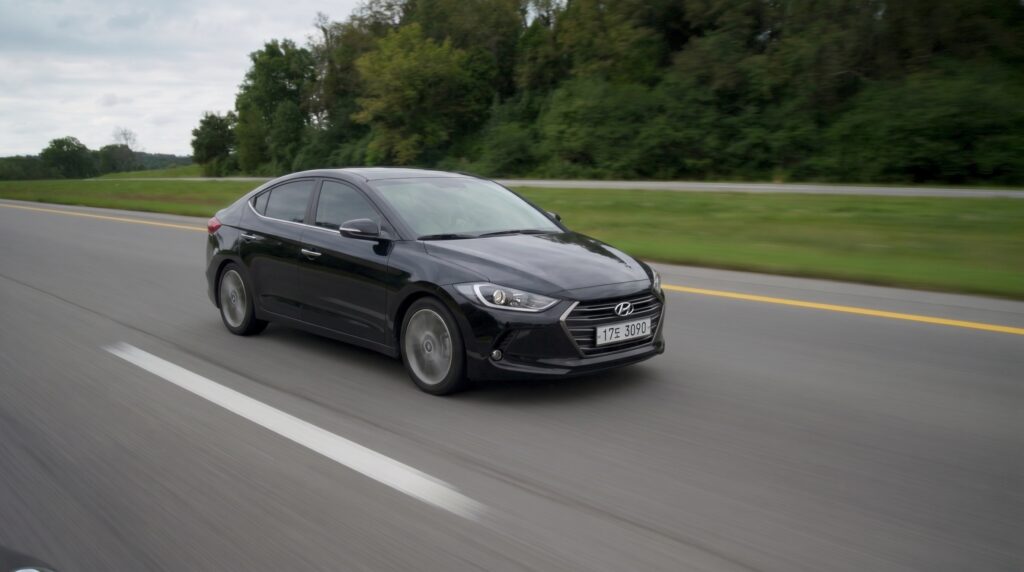
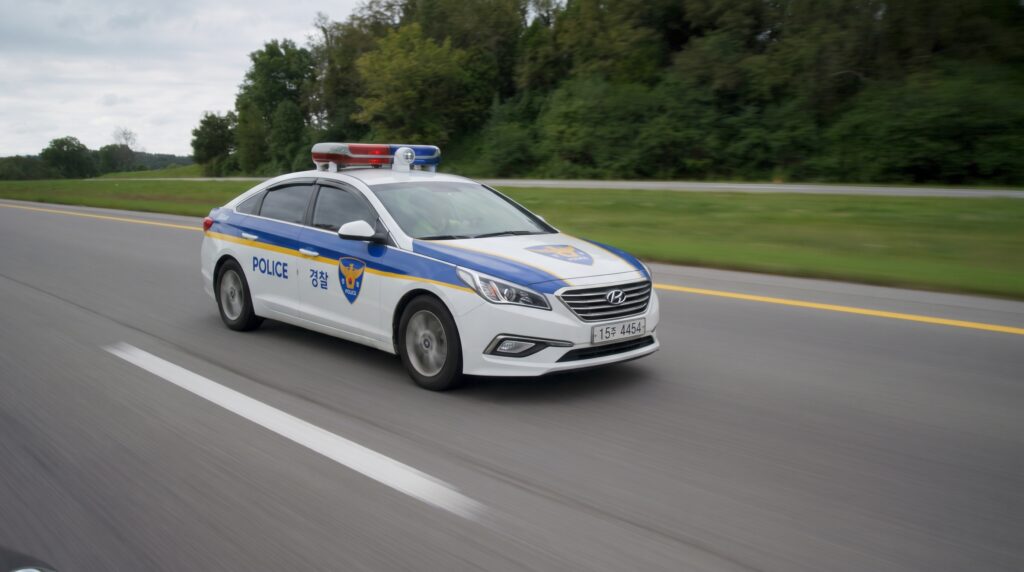
Next, I needed my vehicles. I sourced reference photos online for a standard black sedan and a Korean police car. To get these cars sitting correctly in the environment before generating the video, I used nano banana pro. I took one frame of the raw road footage and fed it into the AI along with the car photos, using this specific prompt:
“Place the police car on the road, travelling from left to right of the frame. Make sure the size proportion of the car to the road is correct and logical. Make sure the car plate and text are clear.”
I repeated this process for both cars until I had two clean, properly proportioned still images of the vehicles sitting exactly where I wanted them on the road.
The resulting reference images after going through Nano Banana Pro
Step 2: Old School Blocking in After Effects
AI video generators are powerful, but they often lack spatial awareness and timing unless you guide them. To fix this, I jumped into After Effects.
I loaded up the raw video footage and used the two AI-generated still images as a size reference. I then created simple 3D geometry in AE: a black cube to represent the getaway car, and a blue cube for the police cruiser. I animated these cubes flying down the empty road, matching the exact speed, scale, and trajectory I wanted for the final shot.
This gave me a flawless reference video to feed back into the AI.
The reference video with animated colored cubes
Step 3: Bringing it to Life with Kling 3.0 Omni
With my AE reference video and the two car images ready, I moved over to Kling 3.0 Omni. The goal was to have Kling look at the animated cubes and replace them with the photorealistic cars, while adding all the environmental effects.
Here was the prompt I used:
“Use Video as a reference. Replace the black cube with the black car in Image 1 and replace the blue cube with the police car in Image 2. Police lights flashing as the police car drives by. Heavy motion blur.”
After tweaking and refining the prompt twice, the output was incredibly solid. The AI nailed the heavy motion blur, the flashing police lights, and the raw speed of the pursuit.
The final output
The Catch: The Missing Seed Number
While the final result looked great, this workflow highlighted a significant limitation with current web-based AI tools.
I wanted to generate that exact same successful result again at a higher resolution. However, because the web UI for Kling doesn’t allow you to lock in or input a specific seed number, I couldn’t reproduce the exact same generation. I was entirely at the mercy of the random noise generation.
An example of a failed output
It is a great lesson in the current state of AI video tools: they can save you from a logistical nightmare and produce amazing results, but the lack of granular control, like seed retention, means you have to be ready to adapt when upscaling or revising shots.
Finding the sweet spot between traditional compositing and generative AI is currently one of the most exciting challenges in VFX. I recently wrapped up a shot that perfectly encapsulates this hybrid approach, relying on traditional spatial blocking in After Effects and letting AI handle the heavy lifting for the environment generation.
Here is a breakdown of the workflow, the tools used, and a few quirks I noticed along the way.
The Brief & Scenario
The Setup: A client needed a gritty, grounded cinematic shot for a tactical shooter promo.
The Action: A sniper positioned on a concrete rooftop takes a high-recoil shot at an off-screen target, set against an ordinary, quiet cityscape at night.
The Catch: The only supplied material was a single, static shot of an actor performing the action in front of a studio greenscreen. No environment plates or 3D environment assets were provided.
Green screen footage
Instead of building a matte painting or full 3D environment from scratch, I used this as an opportunity to test an AI-assisted pipeline using Nano Banana and Kling AI.
Step 1: The Foundation (After Effects)
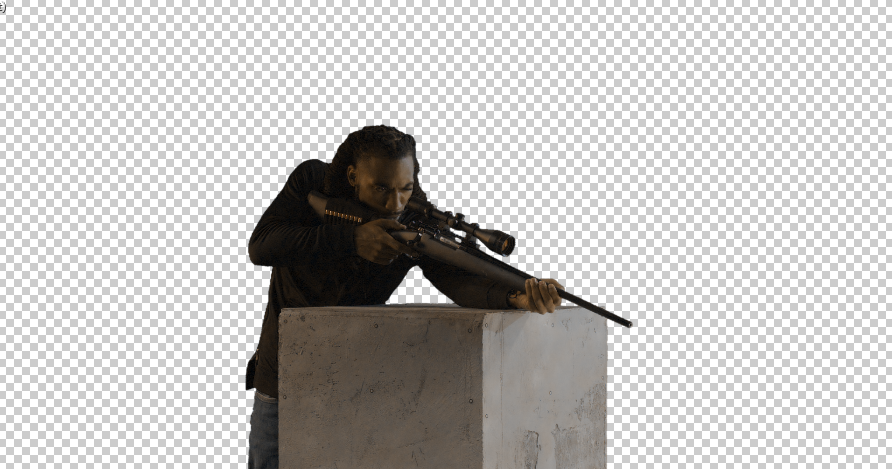
Everything started in After Effects. To get a clean slate, I applied Keylight to pull the greenscreen, isolating the actor completely.
Keylight and garbage mask applied to footage
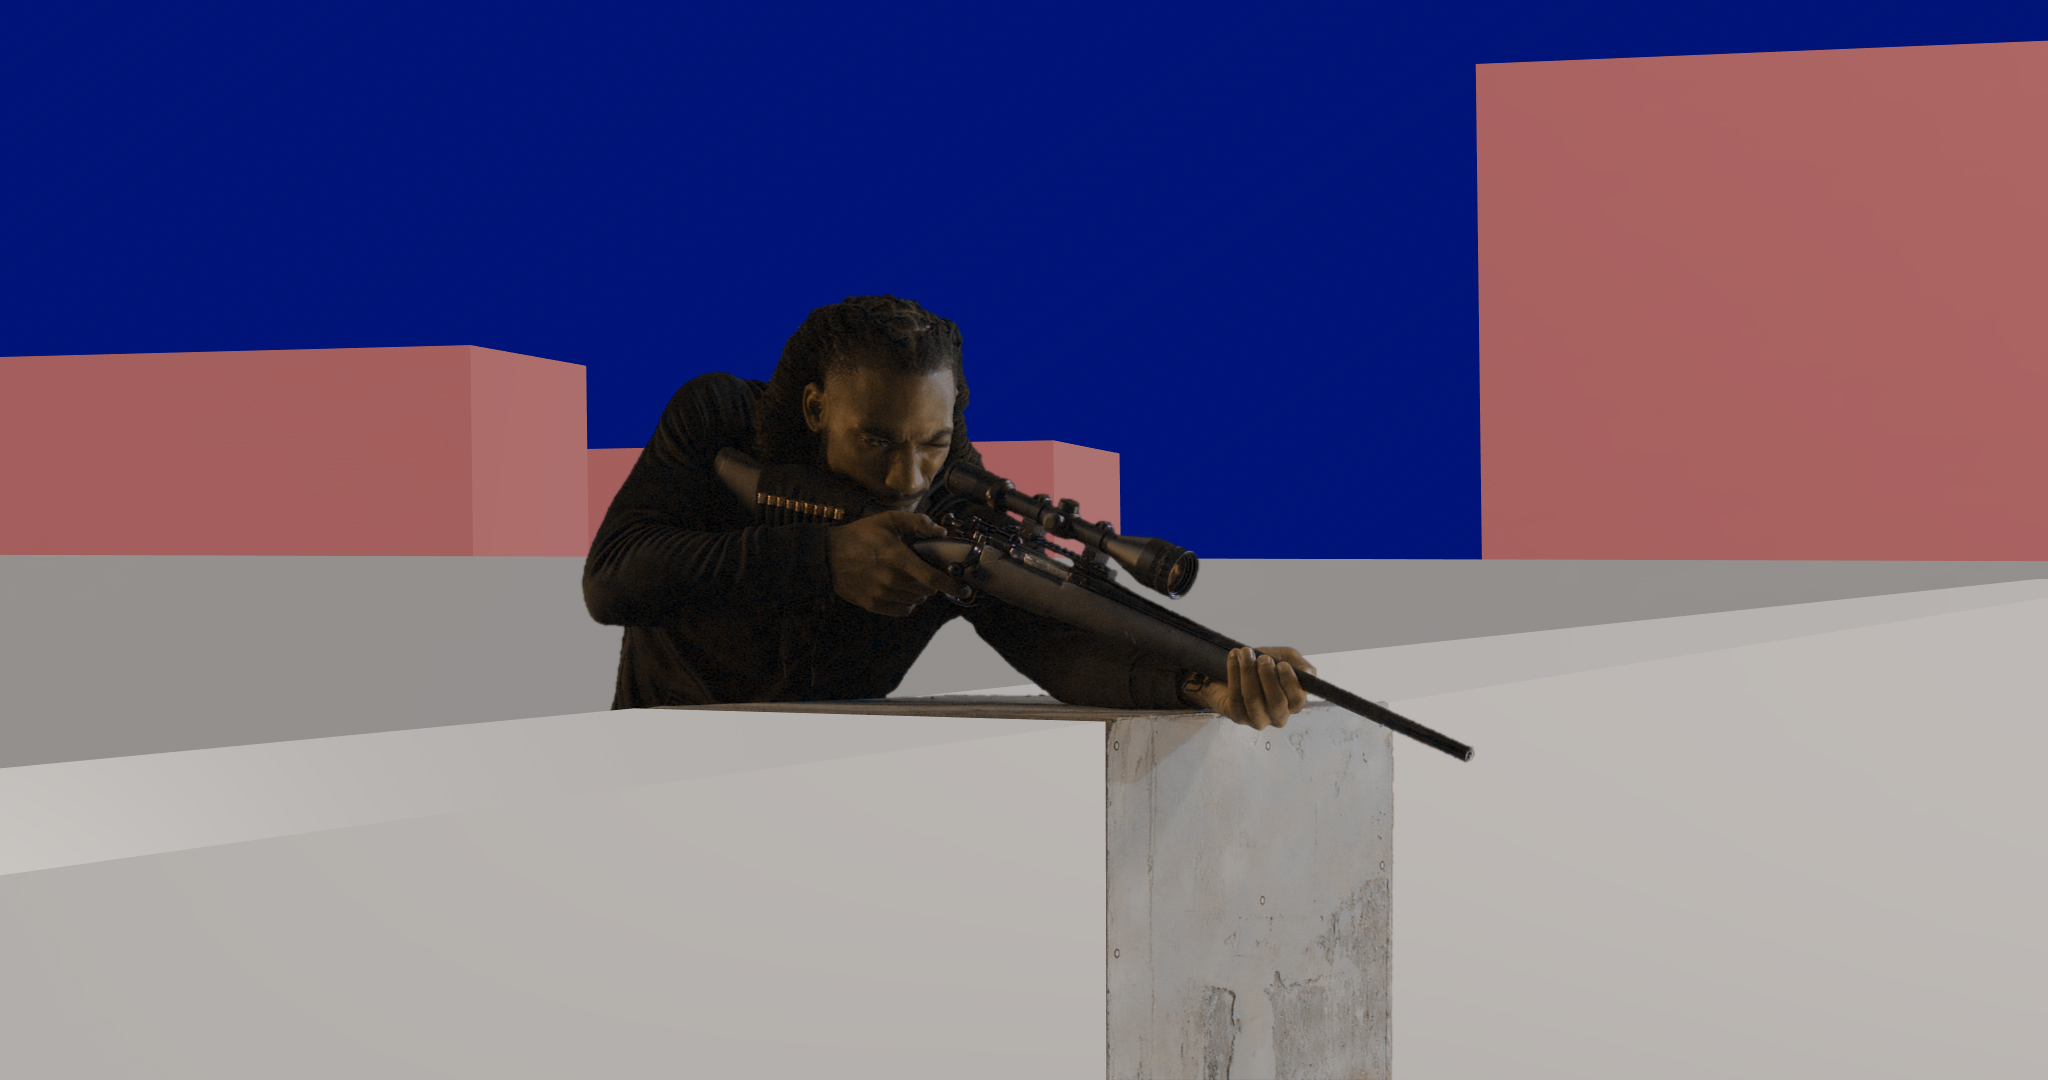
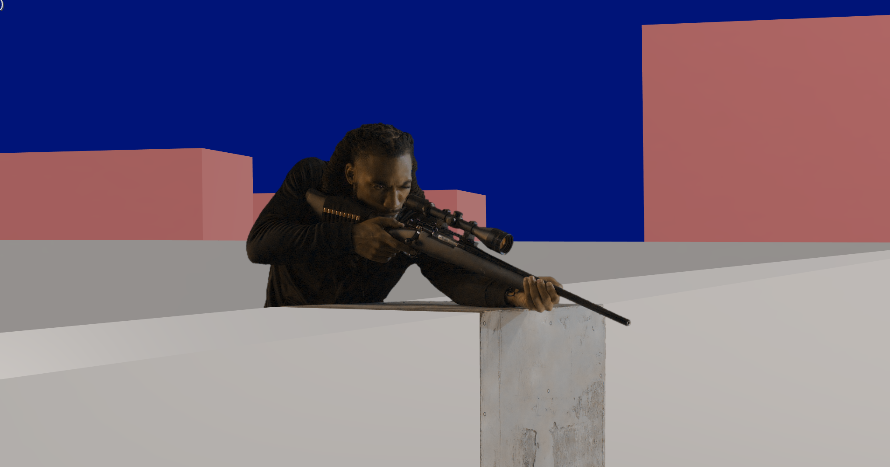
Since AI video generators need robust spatial context to understand depth and geometry, I couldn’t just feed the alpha channel into a generator. I built a rough 3D spatial block-out directly in AE to serve as a guide:
Grey 3D Cubes: Placed around the actor to map out the concrete rooftop and ledge.
Red 3D Cubes: Placed in the background to indicate the scale and placement of the distant apartment buildings.
Blue Solid: Placed at the very back to act as the night sky placeholder.
Added 3D elements to footage within AE
Step 2: Look Dev (Nano Banana)
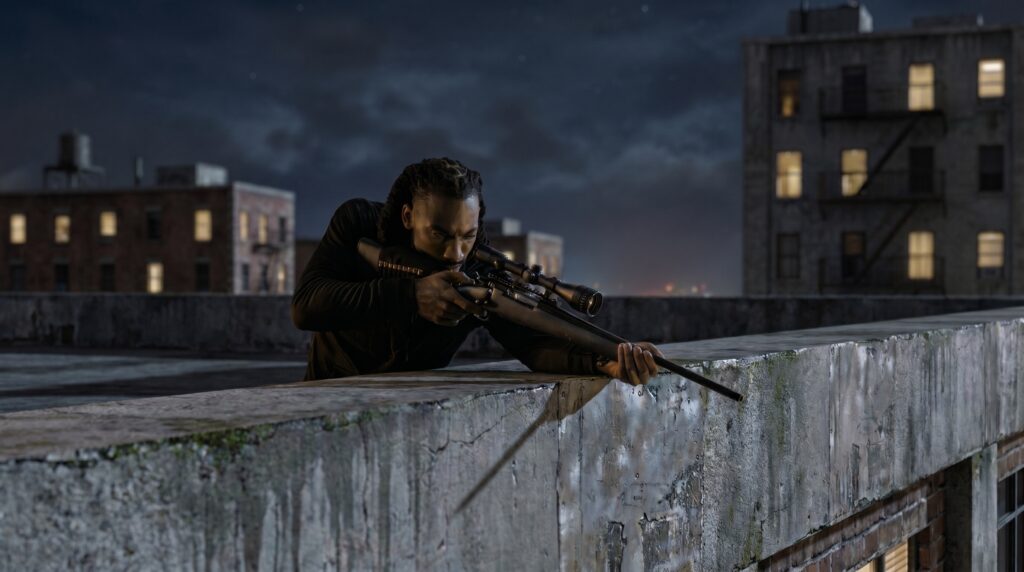
With the spatial blocking complete, I exported the First Frame (FF) of this sequence.
I brought this FF into Nano Banana to establish the art direction. I prompted the model to interpret my colored cubes, turning the grey blocks into weathered, stained concrete, the red blocks into realistic brick apartment buildings with fire escapes and water towers, and the blue solid into an overcast night sky.
It took a few iterative generations, but the geometry blocking held up perfectly and guided the generation exactly where I needed it.
Nano Banana Pro FF output
Step 3: Motion Generation (Kling AI)
This is where the process becomes incredibly interesting. I took the original reference video (the keyed actor interacting with the primitive colored 3D cubes) along with the finalized First Frame from Nano Banana, and ran them through Kling AI.
A big reason I used AI for this shot was to handle the transient effects. I prompted Kling to produce the muzzle flare, muzzle smoke, and dust particles exactly when the actor acted out the shot being fired. The environmental consistency was fantastic. The AI tracked the structural intent of the cubes and populated the realistic urban background beautifully behind the actor’s movements while successfully generating the gunfire effects.
Result from Kling generation
The Caveat: One interesting quirk I noticed was how Kling interpreted the actor’s final pose. The recoil itself matched the original footage perfectly, but at the very end of the action, Kling repositioned the rifle back to its original starting position. In the original greenscreen footage, the actor actually kept the rifle held slightly backward due to the recoil weight. It is a great reminder that while AI is excellent at style transfer and environment generation, strict kinetic accuracy still requires a watchful eye.
Step 4: Final Compositing (After Effects)
With the muzzle flash and smoke successfully generated by Kling, I brought the output back into After Effects for the finishing touches.
I tied the whole shot together with some optical glow, a subtle vignette, and a cinematic color grade to unify the AI-generated city with the actor’s original lighting.
Final output
Final Thoughts: Using primitive 3D shapes to control AI generation is an incredibly effective workflow. By defining the volume and depth explicitly in After Effects, you drastically reduce the AI’s tendency to hallucinate structural details, allowing you to focus entirely on art direction and finalizing the composite.
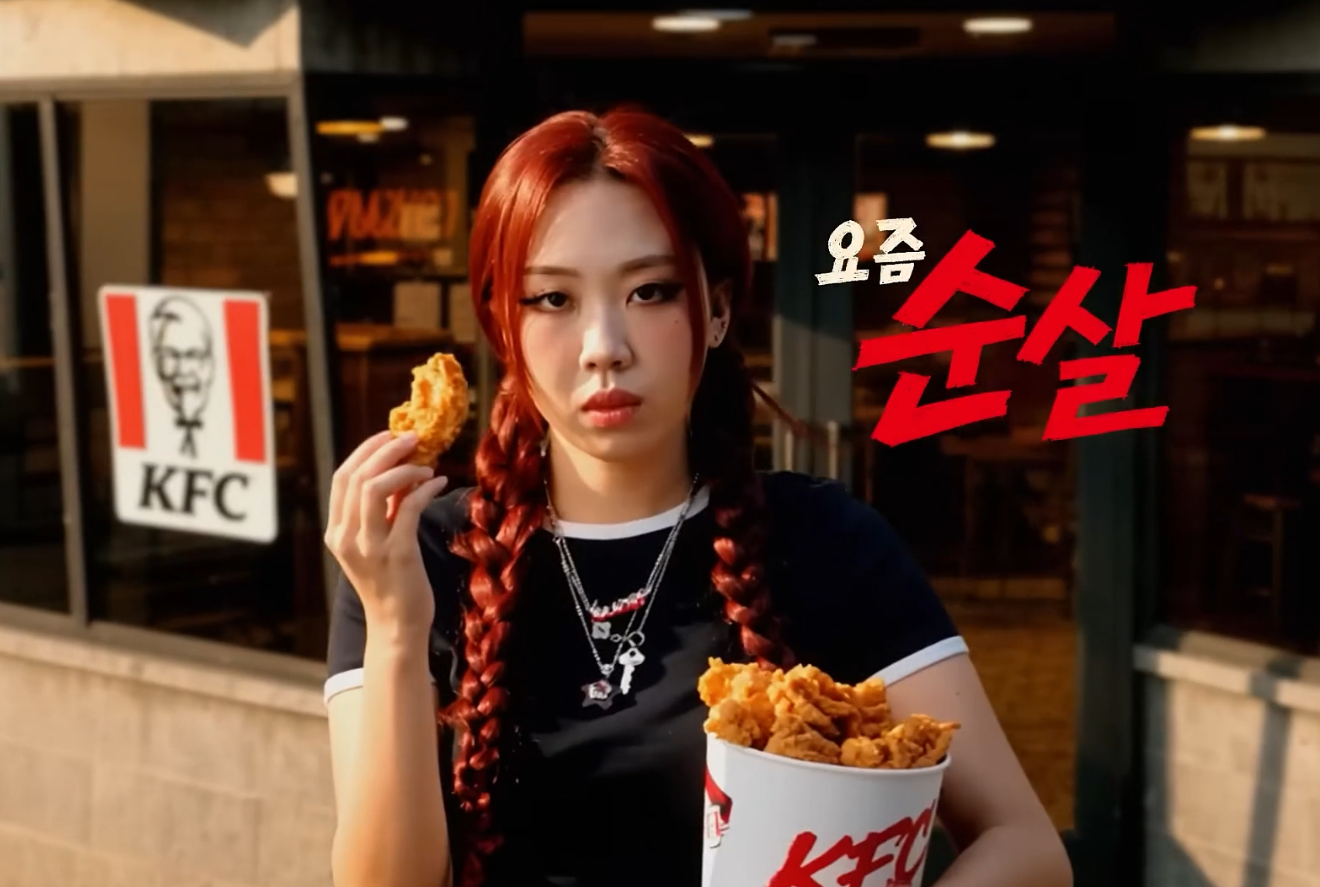
Do you guys remember the Youngji red hair scandal during the local elections? She dyed her hair red, people started taking it as a political signal, and she had to rush to the salon, dye it back to black, and drop an apology. But what happens to the commercial spots she already shot? She had this KFC commercial running where she was still sporting the red hair. I thought this was the perfect scenario for some practice. I wanted to see if I could use AI to retroactively change her hair to black in a 3-second shot from that commercial. It’s kinda like a narrative behind the reason I chose this specific shot to practice on, treating it like a real-world post-production rescue mission to fix a finished asset without needing a reshoot.
The 3-second shot to be worked on.
Getting the First Frame
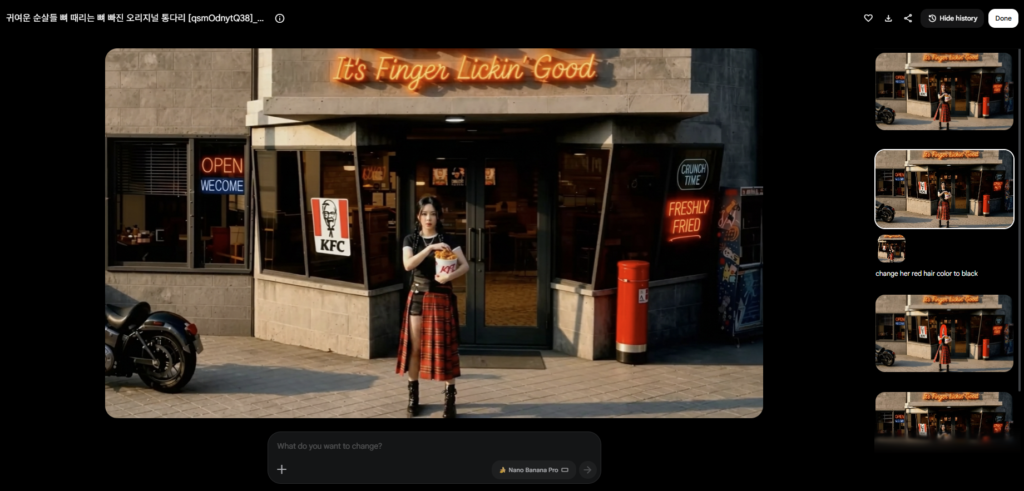
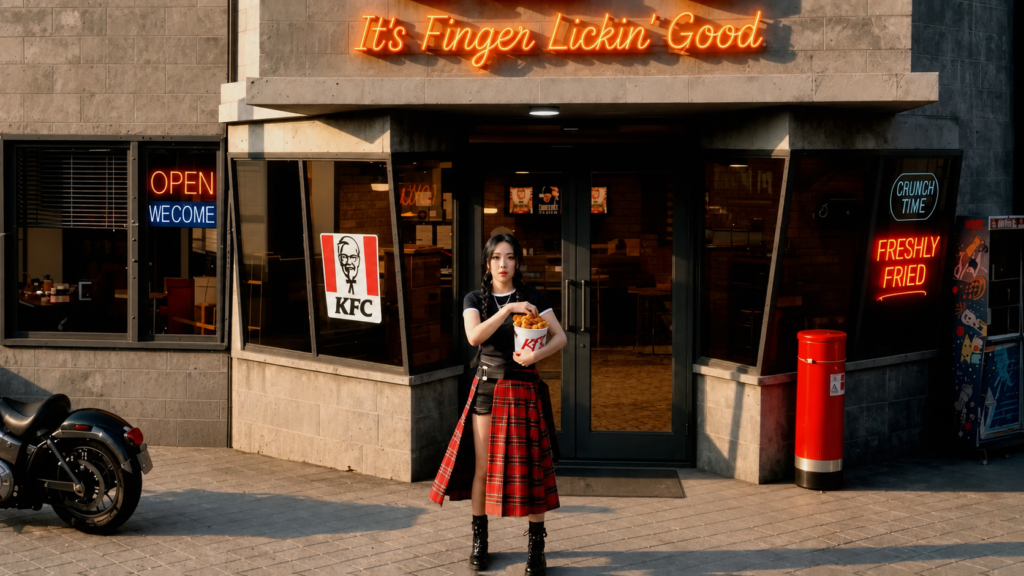
I started by taking the shot and extracting the very first frame using AE. At first, I used Nano Banana Pro to change the hair color, but several prompts later, her face kept changing. I decided to switch over to ChatGPT Images 2.0, and it was one prompt, one kill. It gave me the perfect starting frame with black hair while perfectly preserving her actual face.
Nano Banana Pro kept giving me Rose from Blackpink and couldn’t keep the rest of the scene consistent.ChatGPT Image 2.0 was able to produce the First Frame that I needed.
Generating the Video in Kling
With the first frame ready, I went to Kling and used the First Frame plus Reference Video method. My prompt was to change the subject’s hair color in the video to black, using my newly generated image as the first frame. I hit my first obstacle here because the reference video was too short for Kling. It was about 60 frames for a 24 fps video, but Kling needs a minimum of 72. So, I jumped back into AE and freeze-framed the front and back for a few frames to hit that 72-frame requirement. I put the extended clip back into Kling and ran it. The generation was one try, one kill.
Before and After Kling 3.0
Masking in ComfyUI
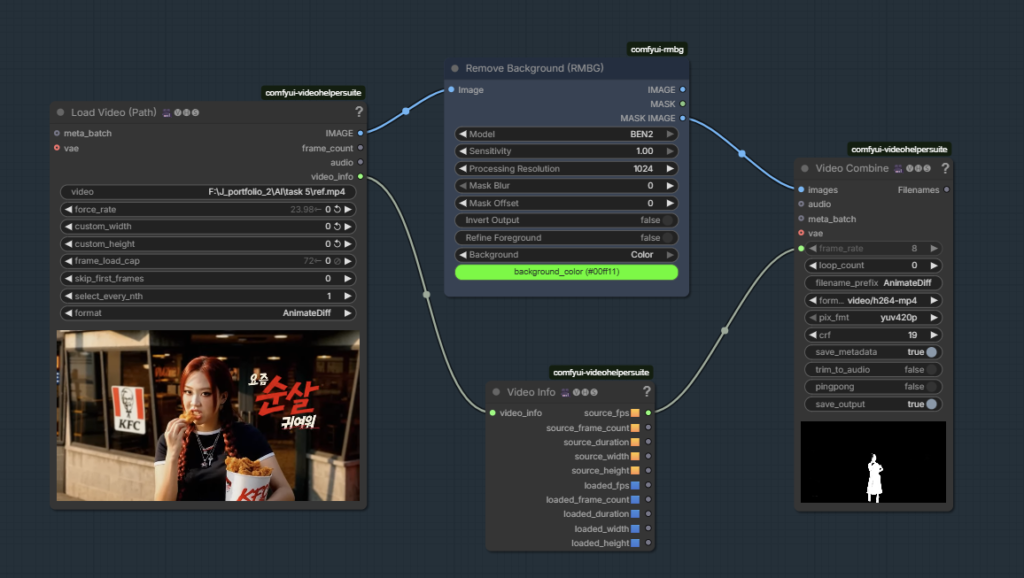
Even with a great AI generation, I didn’t want to just paste the new video over the commercial and ruin the background and all the KFC branding. I needed to isolate her. I booted up ComfyUI and used the RMBG node on the BEN2 model to extract just the mask of Youngji from the original video. Well, I could have rotoscoped her out in AE directly, but where is the fun in doing it manually when I can throw it to AI to do it quickly? Furthermore, all I needed was a rough mask, so RMBG within ComfyUI was more than enough.
Used RMBG (BEN2) to get a mask image video.
Final Comp in AE
For the final step, I brought everything back into AE. I used a luma mask to remove the dark parts of the mask and added a feather to soften it. Then, I used minimax to increase the area of the non-alpha channel so the new mask would completely cover her original red hair. Finally, I overlayed the Kling footage of black-hair Youngji over the original video, using a Track Matte of the edited mask of Youngji to get the final output.
The whole process in a nutshell
The final result seamlessly replaces the controversial red hair while keeping the original environment and lighting completely intact. It really goes to show how integrating generative AI tools into a standard workflow gives you a ton of creative control and efficiency, especially if you ever need to save a campaign from a sudden PR issue.
So, here’s a classic indie film scenario. You finally lock picture on a scene, everything is tracking nicely, and the director is happy. Then the producer walks into the post suite with a massive grin because they just closed a last-minute Product Placement (PPL) deal with BYD. The catch? The car we actually shot on location during a smooth, 5-second aerial drone sequence is a bright blue SUV. Now, it absolutely has to be a white BYD car.
The 5-second aerial drone sequence to be worked on.
Instead of booking an expensive reshoot or spending days on a full 3D asset tracking pipeline, I wanted to see if I could solve this using a generative AI workflow while keeping the original Full HD plate completely crisp.
Here’s how the process went, the roadblocks I hit, and how I blended AI with traditional compositing to make the shot work.
Avoiding the “AI Hallucination” Trap
When you’re doing a specific vehicle swap for a brand, your biggest hurdle is fidelity. If the AI shifts the contours or gives it a weird generic shape, the illusion falls apart instantly. Since newer EV models like BYD aren’t heavily represented in standard base AI models, my biggest concern was making sure the model wouldn’t hallucinate a totally different car.
I figured the easiest path would be a First Frame + Video-to-Video workflow.
First Frame + Seedance 2.0
I pulled the first frame of the drone shot, grabbed a reference photo of the white BYD car from the internet, and used Nano Banana Pro to generate a clean, structurally accurate first frame.
Then I tossed that generation into Seedance 2.0 for the video-to-video pass. The car reproduction was solid, and it actually nailed the layout of the wheels. However, the environment continuity completely broke down. After a few frames, the background would suddenly jump out of alignment, making the footage completely unusable for a continuous camera move.
Output produced by Seedance 2.0.
Switching to Kling
I ran the exact same first-frame setup through Kling instead. Kling handled the camera tracking perfectly, and the spatial continuity matched the smooth, sweeping drone move exactly.
The downside was the overall image quality of the output. The original footage had a lot of motion blur from the drone’s speed, and the model struggled to upscale those fine details cleanly, leaving the plate looking pretty muddy.
Output produced by Kling.
Cutting Out the AI Noise
At this point, you don’t just throw your hands up; you use traditional VFX logic. If the AI environment looks messy but the car tracking is spot-on, you isolate the car and throw away the rest of the AI noise.
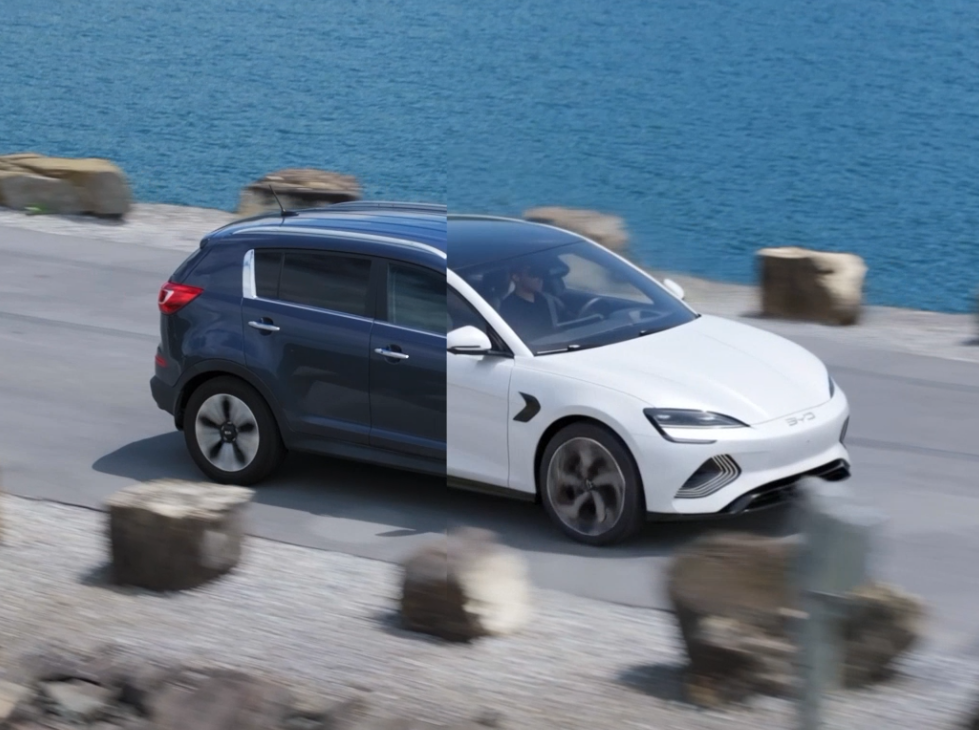
To keep the original Full HD drone plate completely clean, I built a quick compositing bridge. I rotoscoped just the white BYD car out of the muddy Kling render and added a subtle feather to the mask edges so it would transition naturally into the asphalt.
Then, I dropped the isolated AI vehicle directly on top of the original blue SUV on the untouched Full HD plate. To lock it into the scene, I matched the black levels, highlights, and color temperature of the white car to the ambient lighting of the original plate.
Output after compositing Kling 3.0’s car output over the original footage
Final Thoughts
The final composite looks completely convincing in motion. If I’m nitpicking, the wheel rims could definitely be sharper; the image generation pass left the rim textures a bit soft. But because it’s a sweeping drone shot, that slight softness actually works in our favor since it passes naturally as motion blur and lens depth.
Ultimately, it saved the shot in less than a day. Blending quick generative tools with basic compositing logic is becoming an incredibly powerful way to handle these kinds of last-minute continuity headaches.